Carrd Tutorial: Build a Landing Page in Under Ten Minutes From Scratch (Step By Step)

With the vast variety of landing page builders available today, it is hard to choose one that perfectly fits your needs. While platforms like Wix and Shopify are becoming increasingly popular, they are far too complex and do not suit the needs of someone who just wants a simple landing page to showcase a product or project.
This is where Carrd shines. Carrd is an extremely easy-to-use and intuitive website builder that is great for single-page websites. It has been designed keeping in mind low-complexity use cases and can be great for building personal websites and portfolios.
Step By Step Guide To Creating a Website With Carrd
Despite its intuitive user interface, it can be slightly overwhelming for first-time users. This is why we have put together a step-by-step tutorial to help you get started and familiarise yourself with the components.
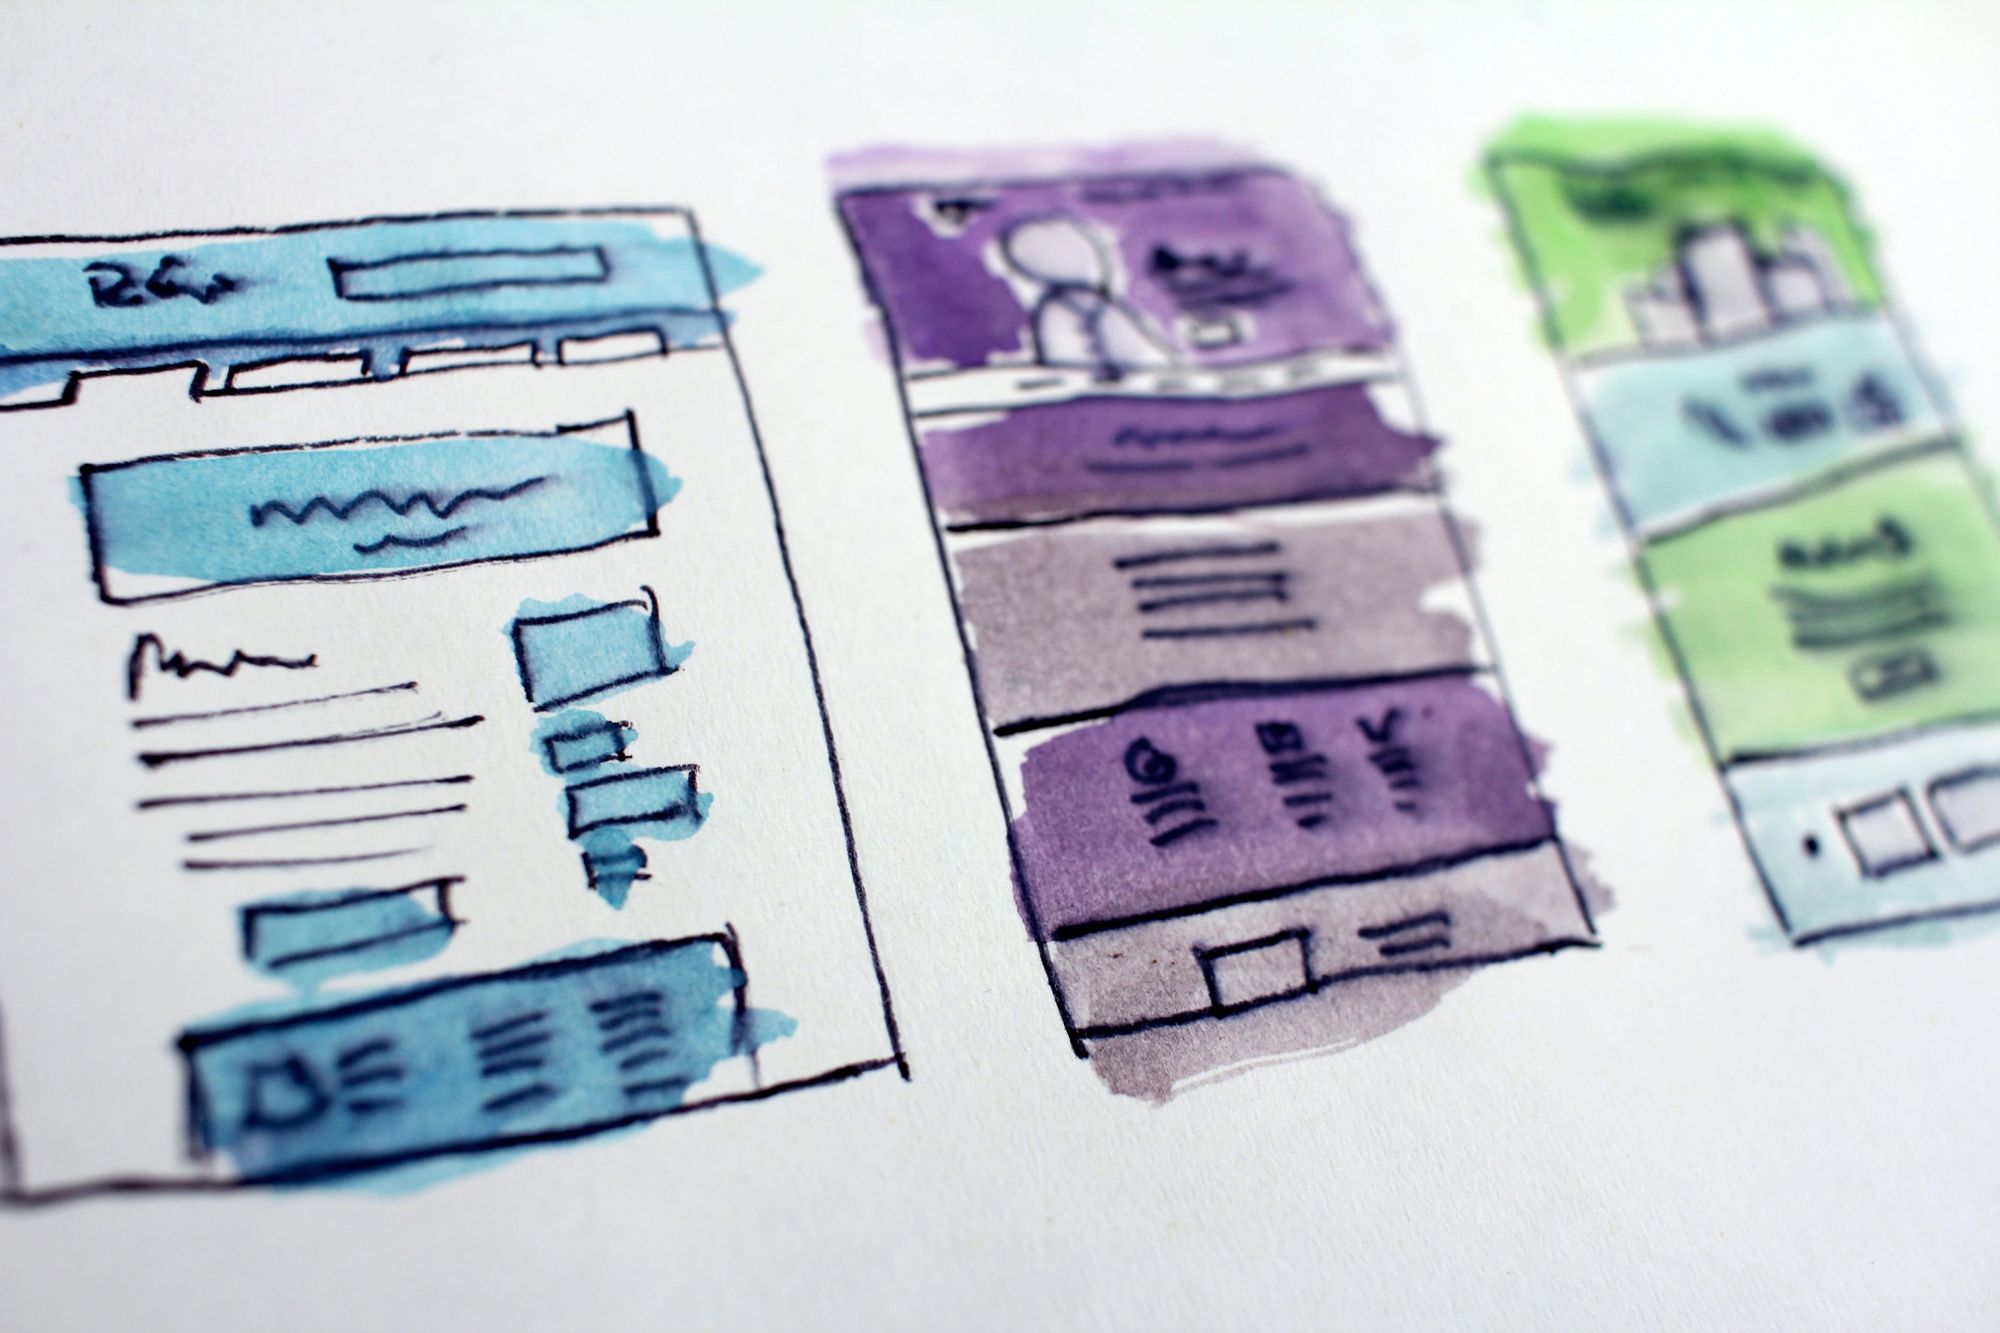
There are some design improvements that we could incorporate, but the purpose of this guided tutorial is to cover the basics of Carrd. If you follow along, you will end up with a final result that will look something like this.

Step 1: Create a Carrd Account
If you don't already have one, the first thing you should do is to set up your profile on Carrd. If you don't have a Carrd account, you will not be able to save and publish your website. Once you have created your account, go to your dashboard.
Step 2: Open a New Blank Canvas For Your Website
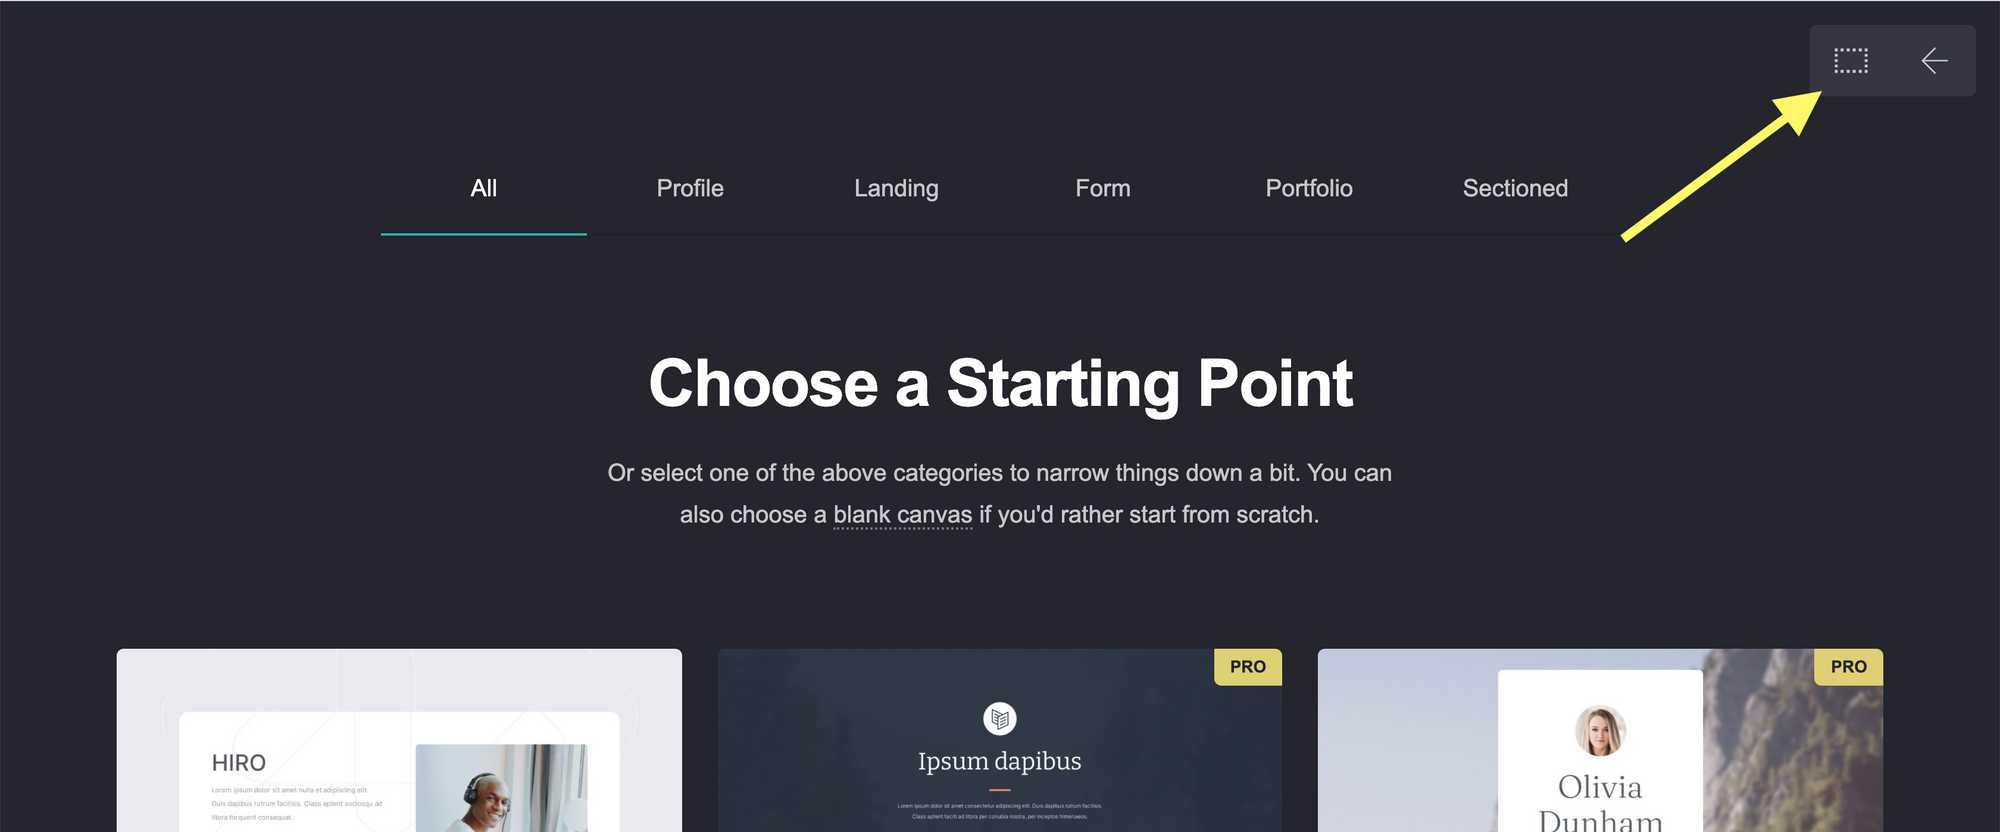
On the top right corner of your dashboard, you will see the "New Site" button. Click on this. You will be redirected to a page where you will get the option to choose a starting point.
You can choose to select a pre-existing template and modify it. However, for this tutorial, we will be building a website from scratch. To open a blank canvas, click on the square icon in the top right corner of the webpage.
Step 3: Basics and Getting Started
Some main elements make up the structure of a Carrd website.
- Background: The main background of your website. This is comparable to the
<body>tag in standard HTML. It lives behind all your elements. You can choose to make this an image, a video, a solid color, or a gradient. - Page: The page element lives on top of the background and houses all the elements of your website. You can reposition or style this to your liking. Each Carrd website has a single page.
- Sections: Sections help divide your site into named regions. You can link to sections from different parts of a website. This improves usability and navigation.
- Container: Containers can be used to group similar elements. A container can hold other elements just like a page. Using a container is good practice to section and organize your website.
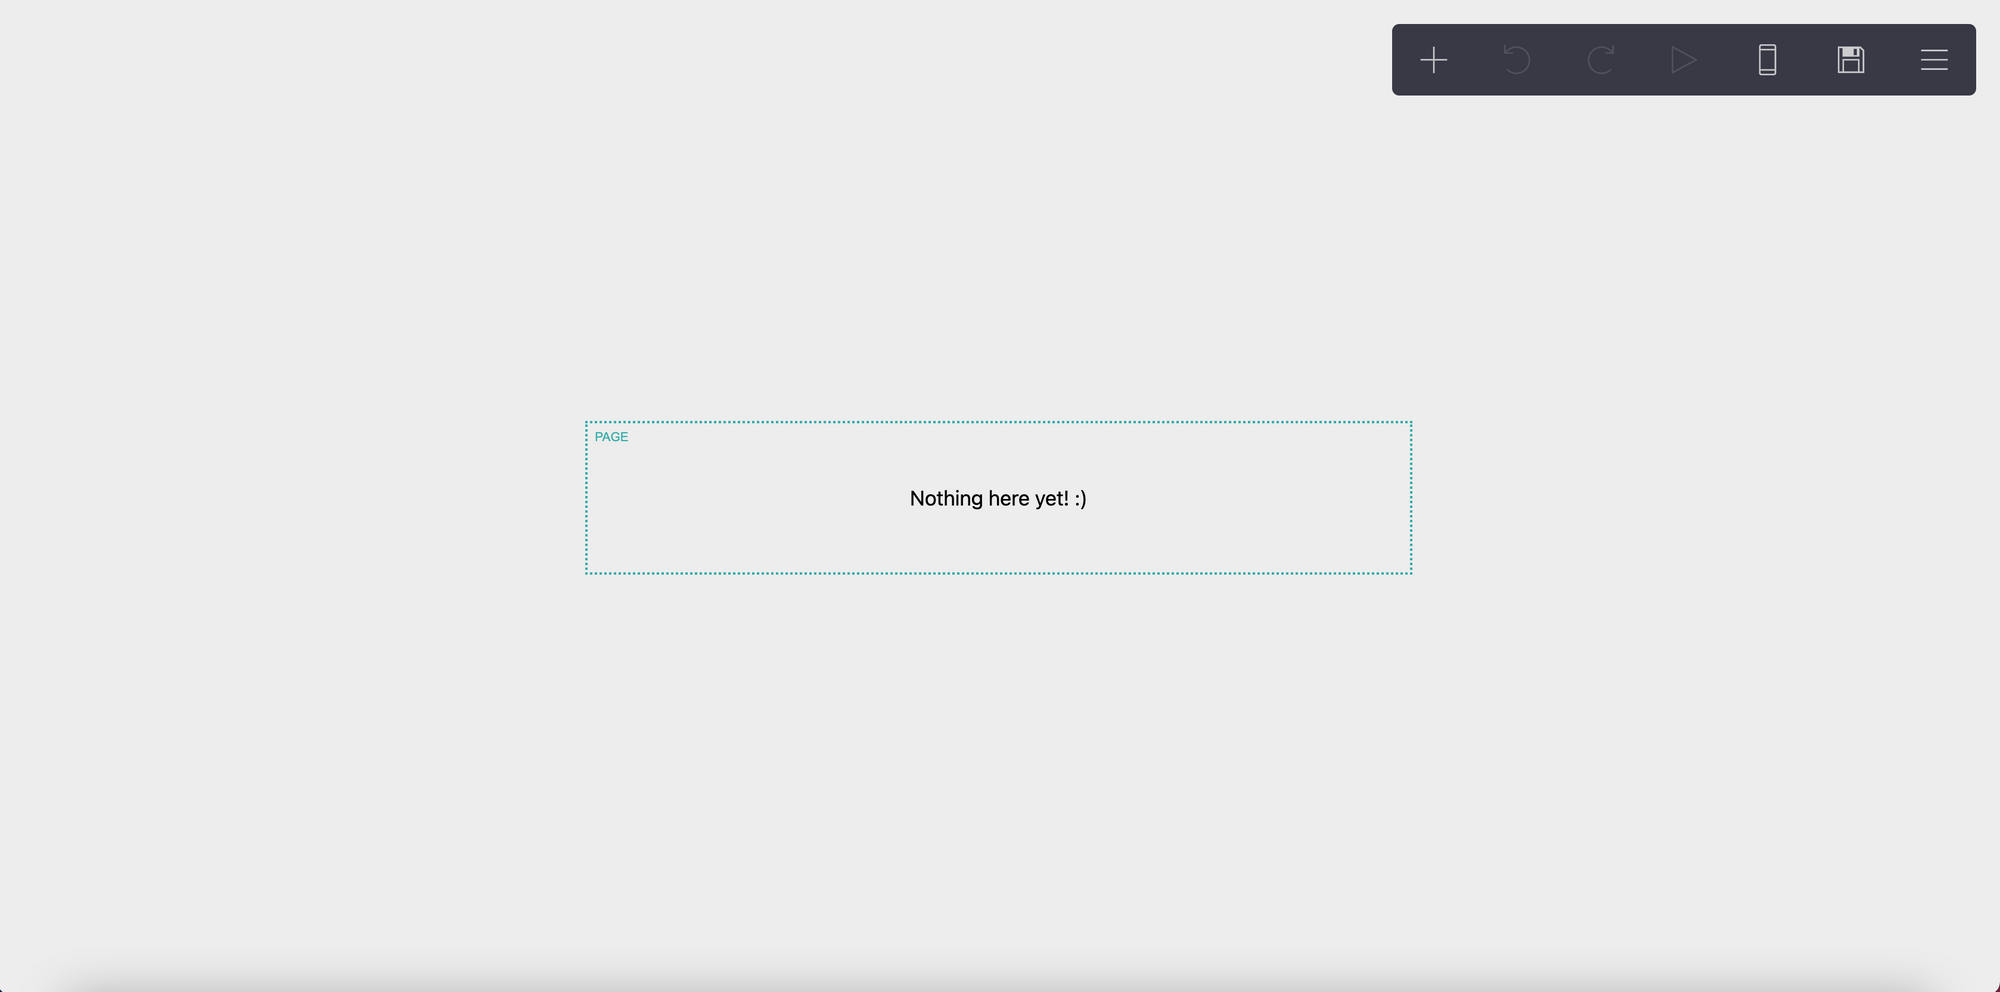
On your new site, you will see a blank white canvas. If you hover your mouse in the center, a page block will appear.
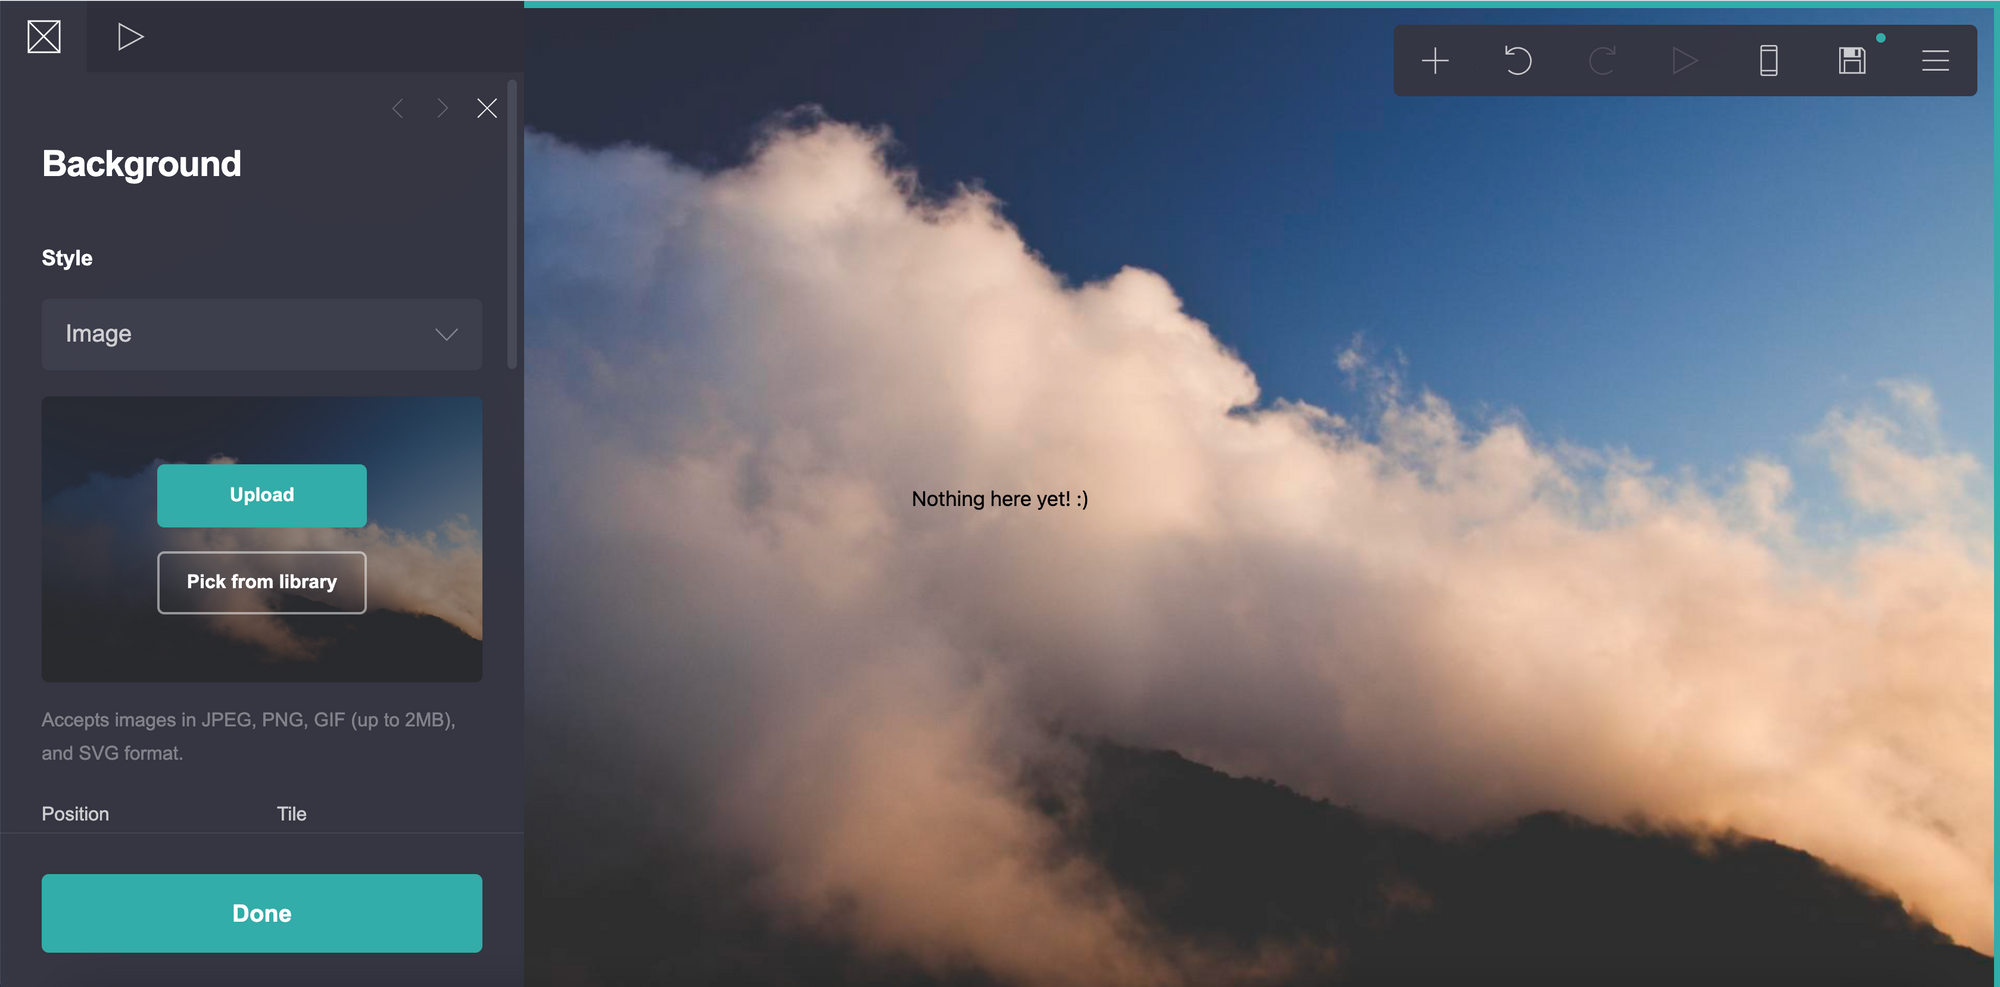
Step 4: Change the Background
Click anywhere on the canvas outside of the page block. The background will be selected, and a side navigation bar will open up. You can change your background to be an image, a video, or a color. Click on the dropdown under the style header and select the image option.
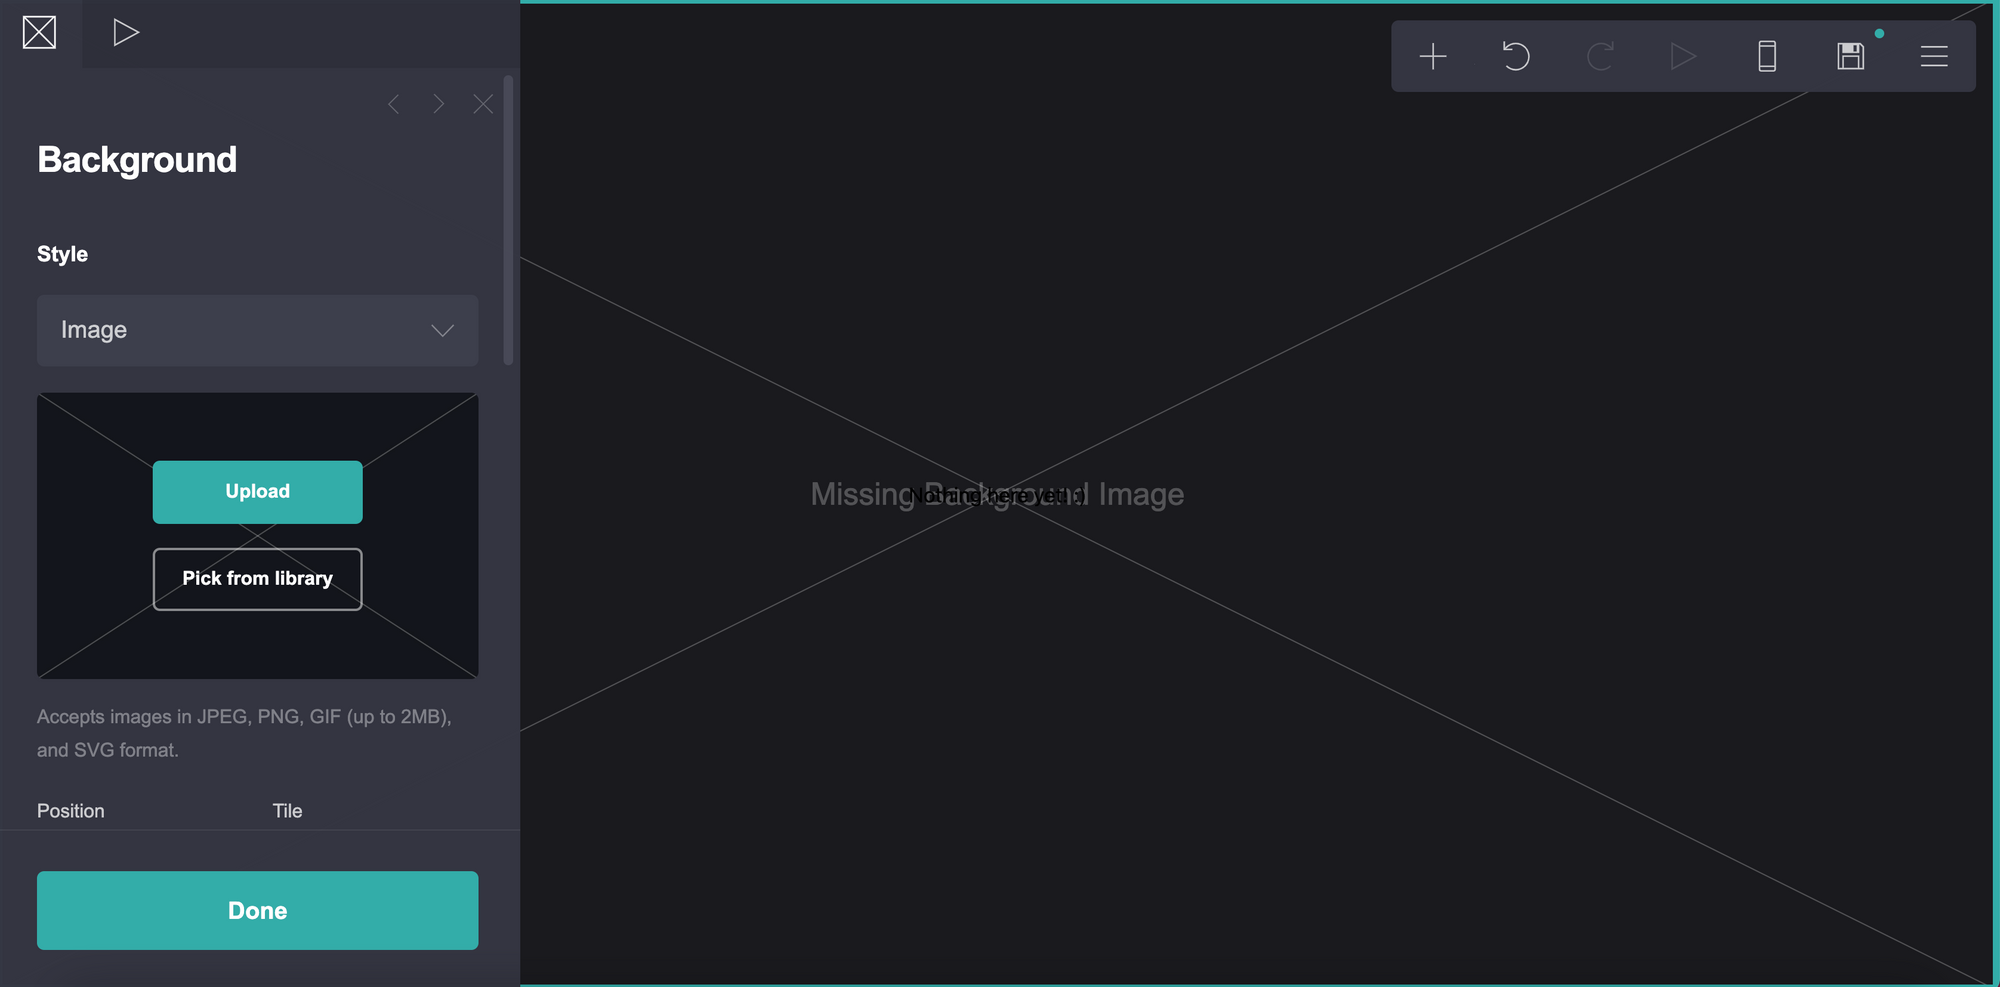
You can choose to upload your own image or pick one from Carrd's library. This will change the image on your background from a blank canvas to the image of your choice.
Step 5: Modify Page Settings
Now that we have modified our background, we can start working on our content. Hover on the center of the canvas and click on the page section. Once you have selected the page, you can change its width by using the toggle under width in the left sidebar. we want our page to cover the entire background, so we are going to set it to 100.

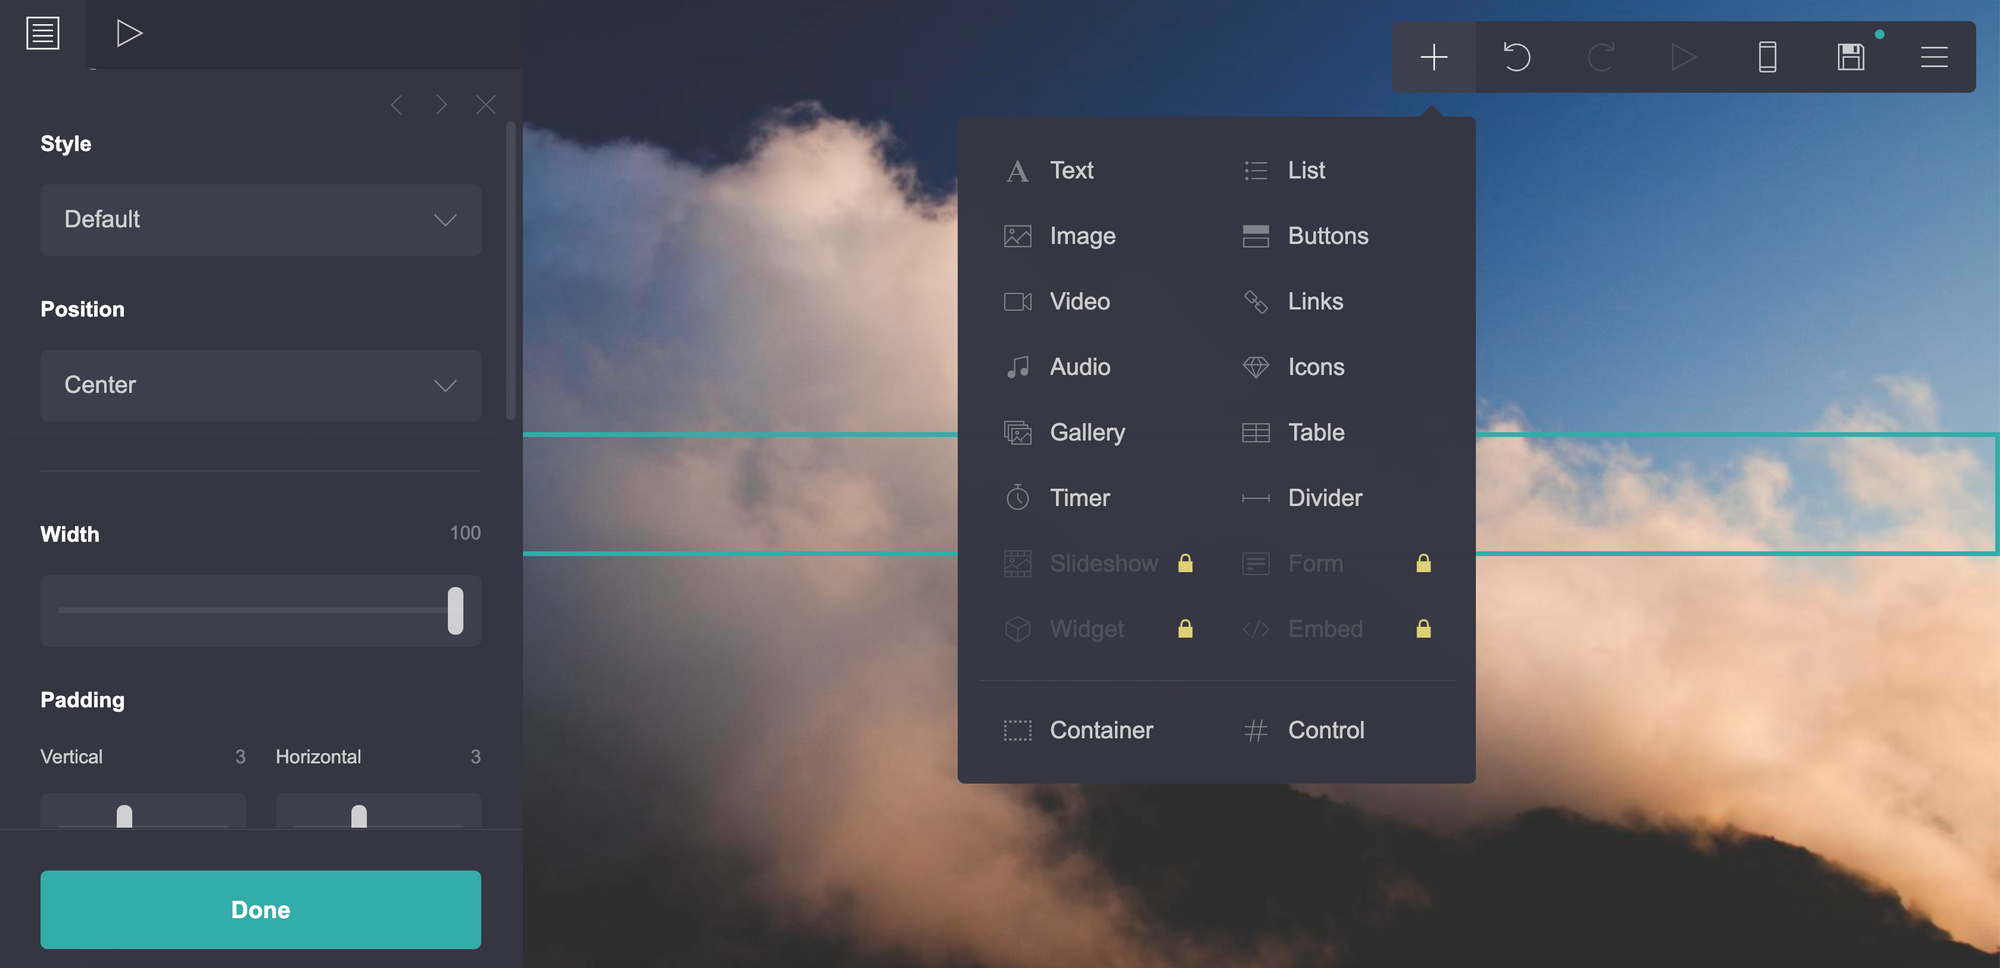
Step 6: Add a Container
With the page element selected, click on the plus icon in the top right navigation bar. This icon is used to add new elements to the canvas. We want to add a container, so select that option.
Using the left sidebar, adjust the width and height of the Container to cover most of the page.
Step 7: Add Header Text
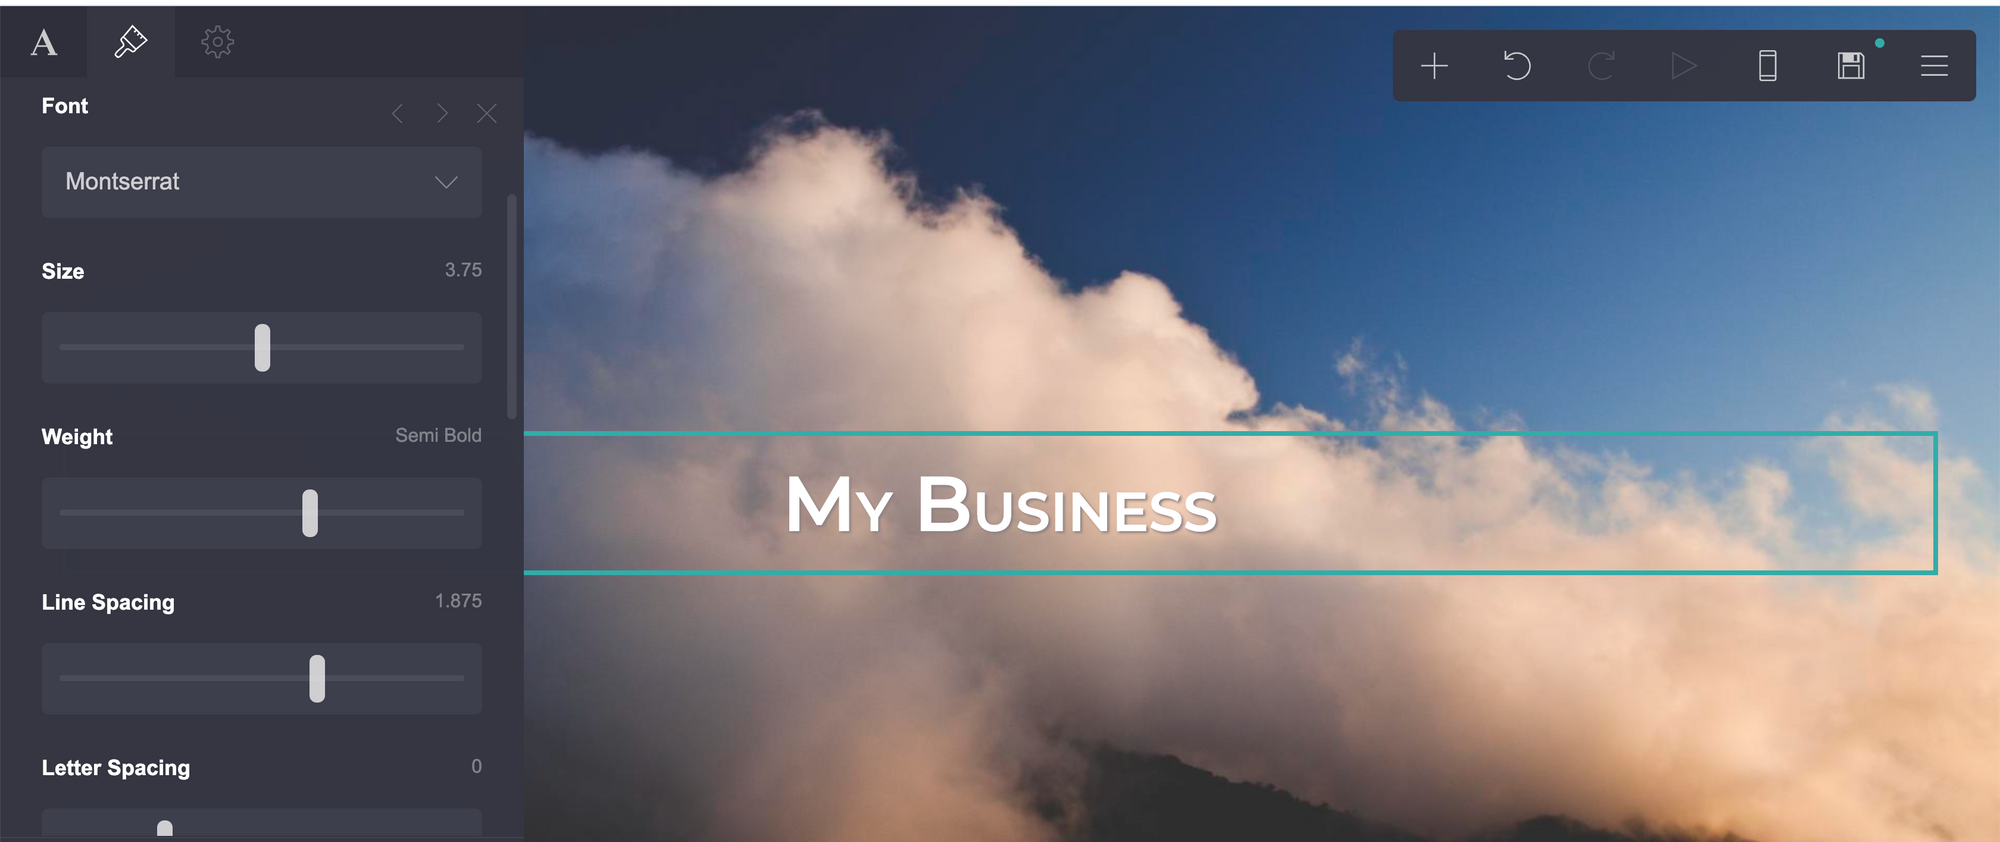
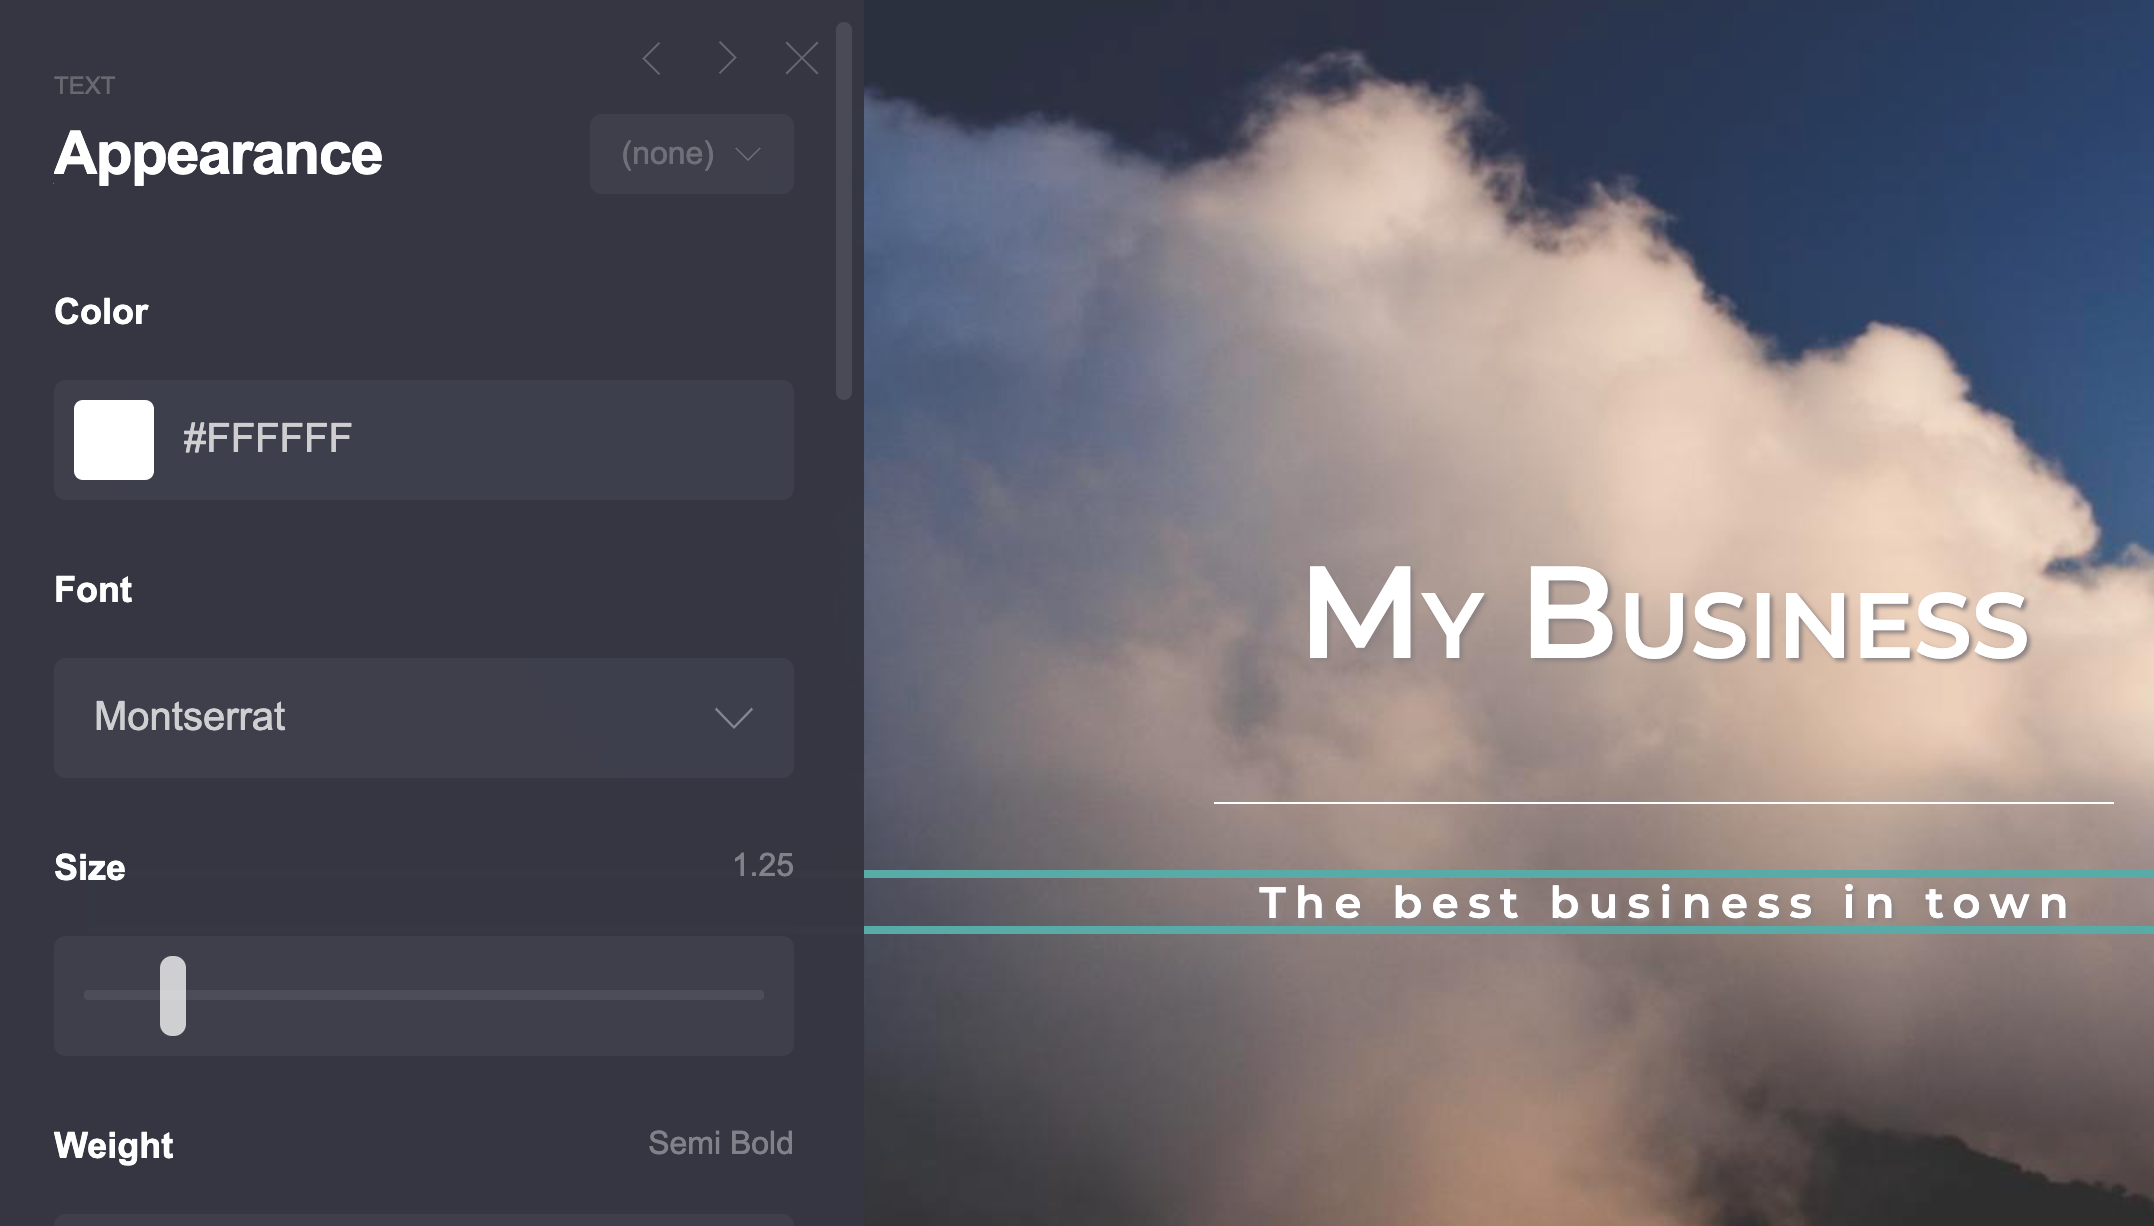
We want to add some header text, so repeat the previous steps and select the text option from the add element dropdown menu. When the text section appears, you can change the appearance and font using the left sidebar.
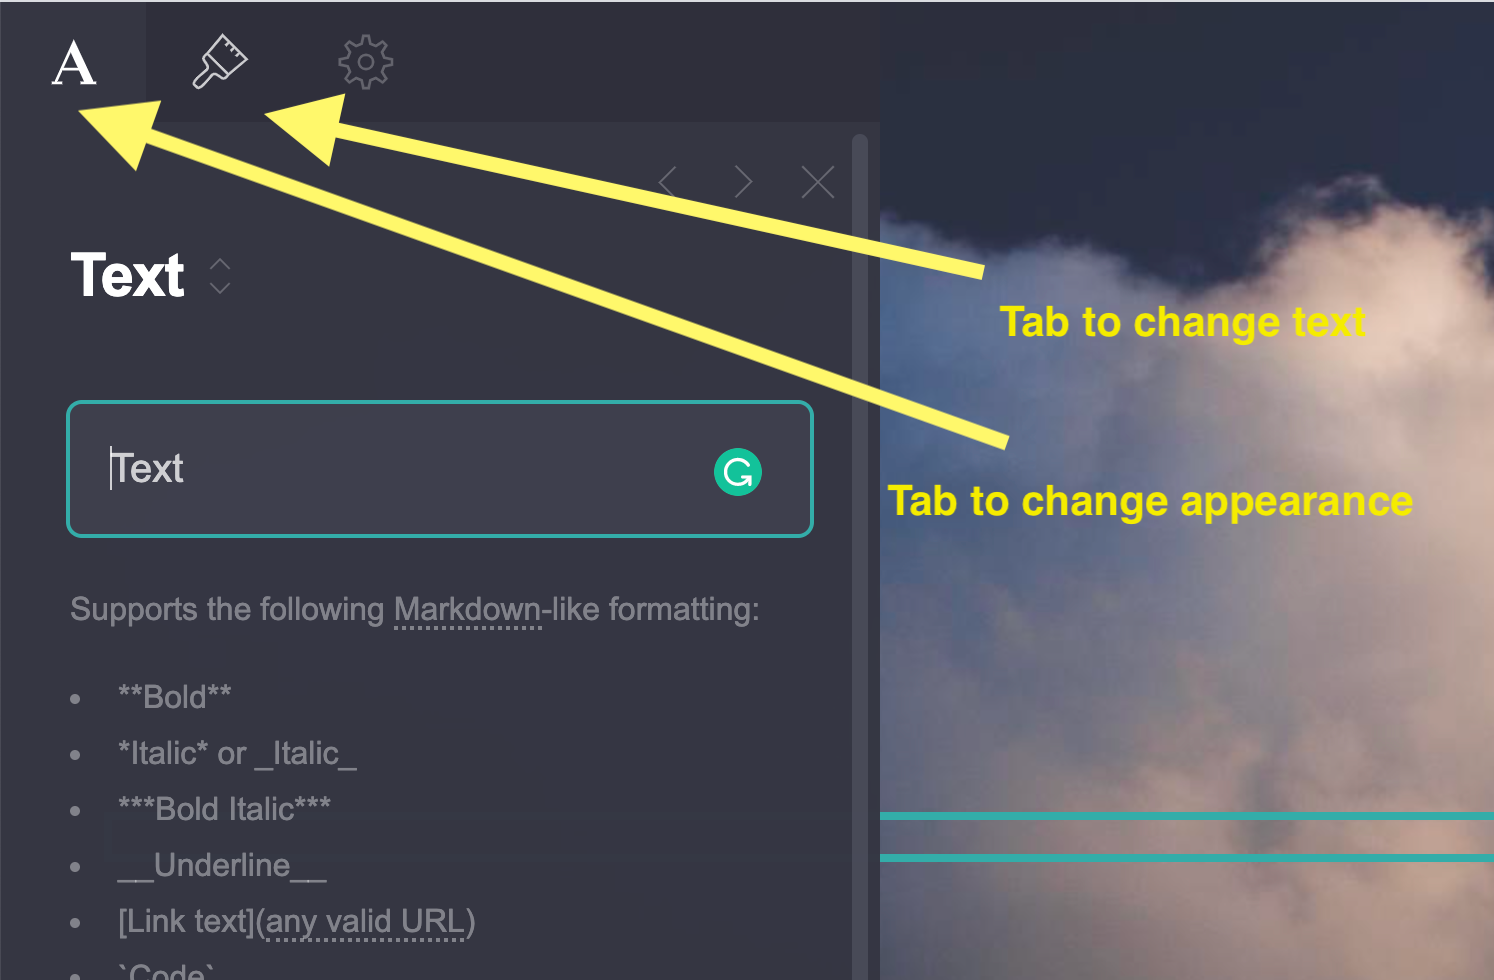
In the text tab, you can change the toggle value for Text to Site Title. Then replace the text with the title of your website. In the appearance tab, you can increase the font size and make other appearance changes such as adding drop-shadow, increasing font-weight and increasing the line and letter spacing.
Step 8: More Text!
We're going to add a divider after our header text, followed by a subheading. Click on the page section and repeat the steps to add a new element. Click on Divider to add a divider. You can adjust the width of your divider in the sidebar.
After this, add text under the divider. Add your subheading and adjust the font size, weight, and letter spacing to suit your needs.
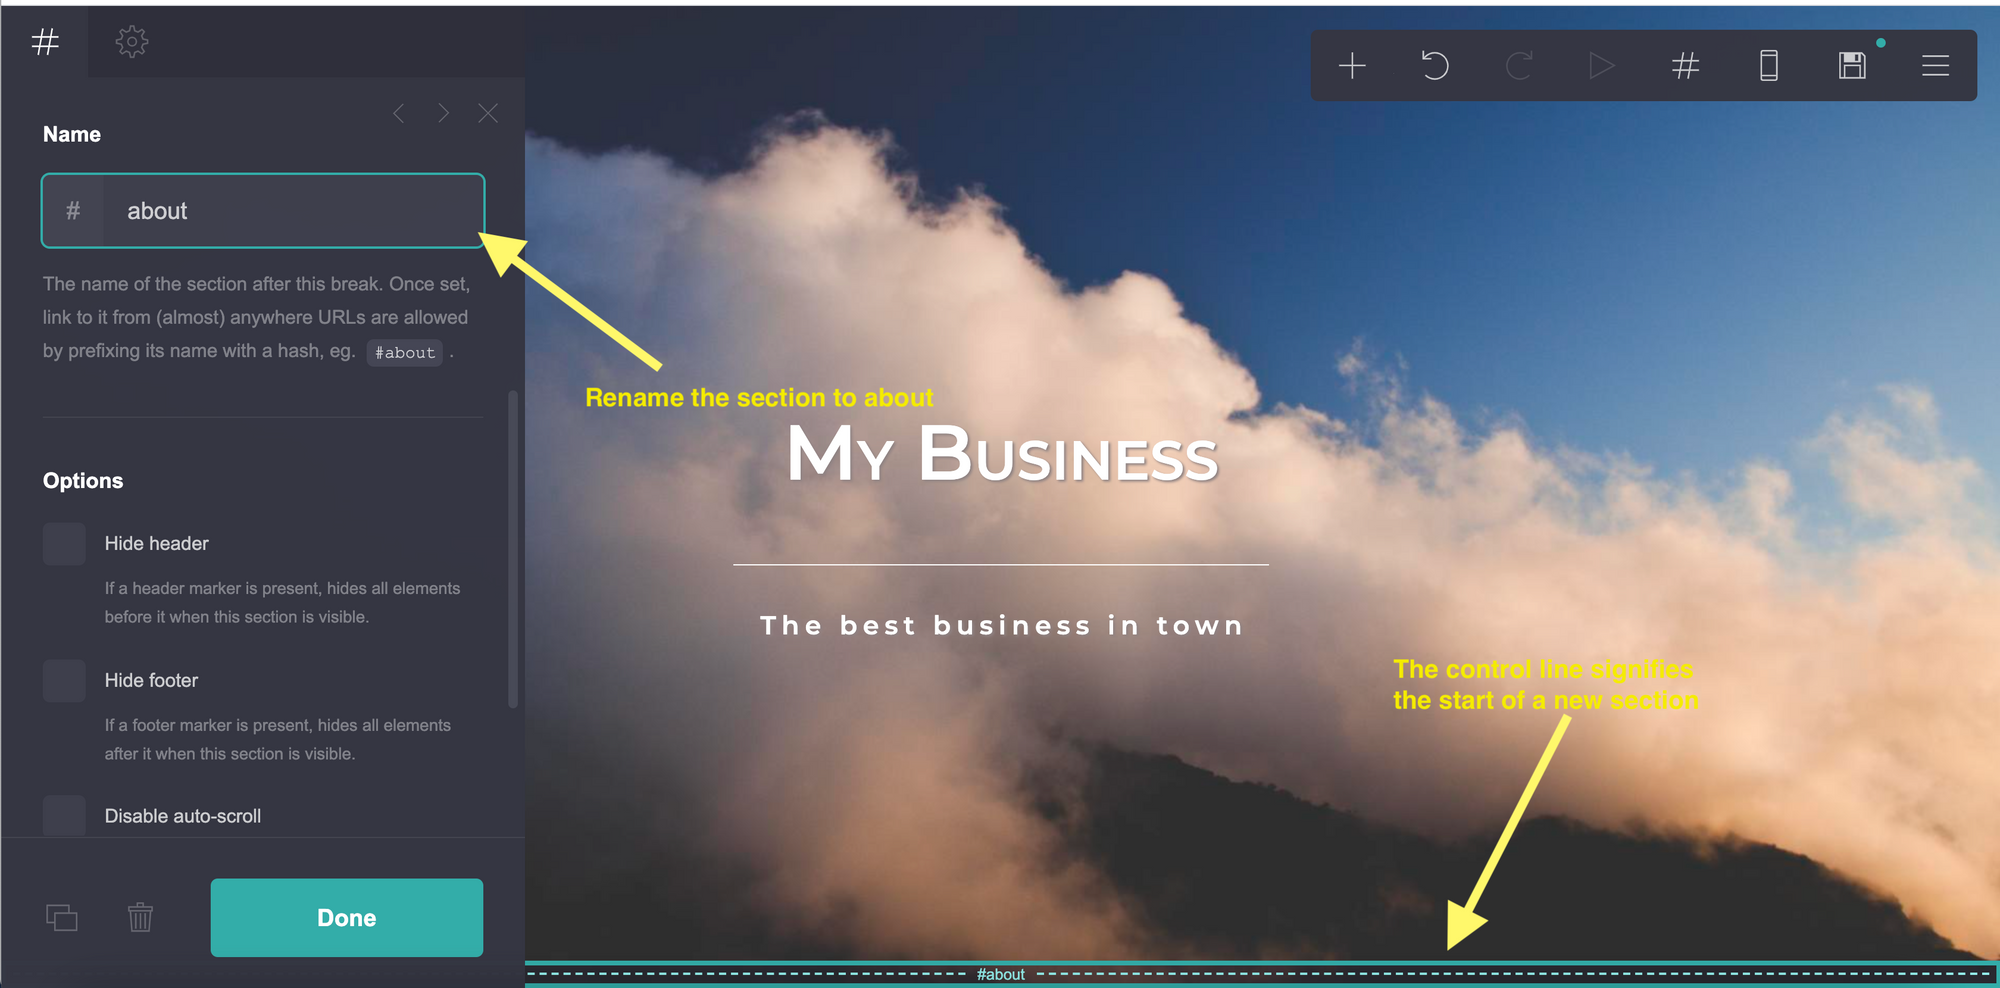
Step 9: Creating a New Section
We are going to create a new section to add some information about our business. For this, we need to select the page, click on the add icon and select the control option. A line should appear right after your container. This signifies the beginning of a new section.
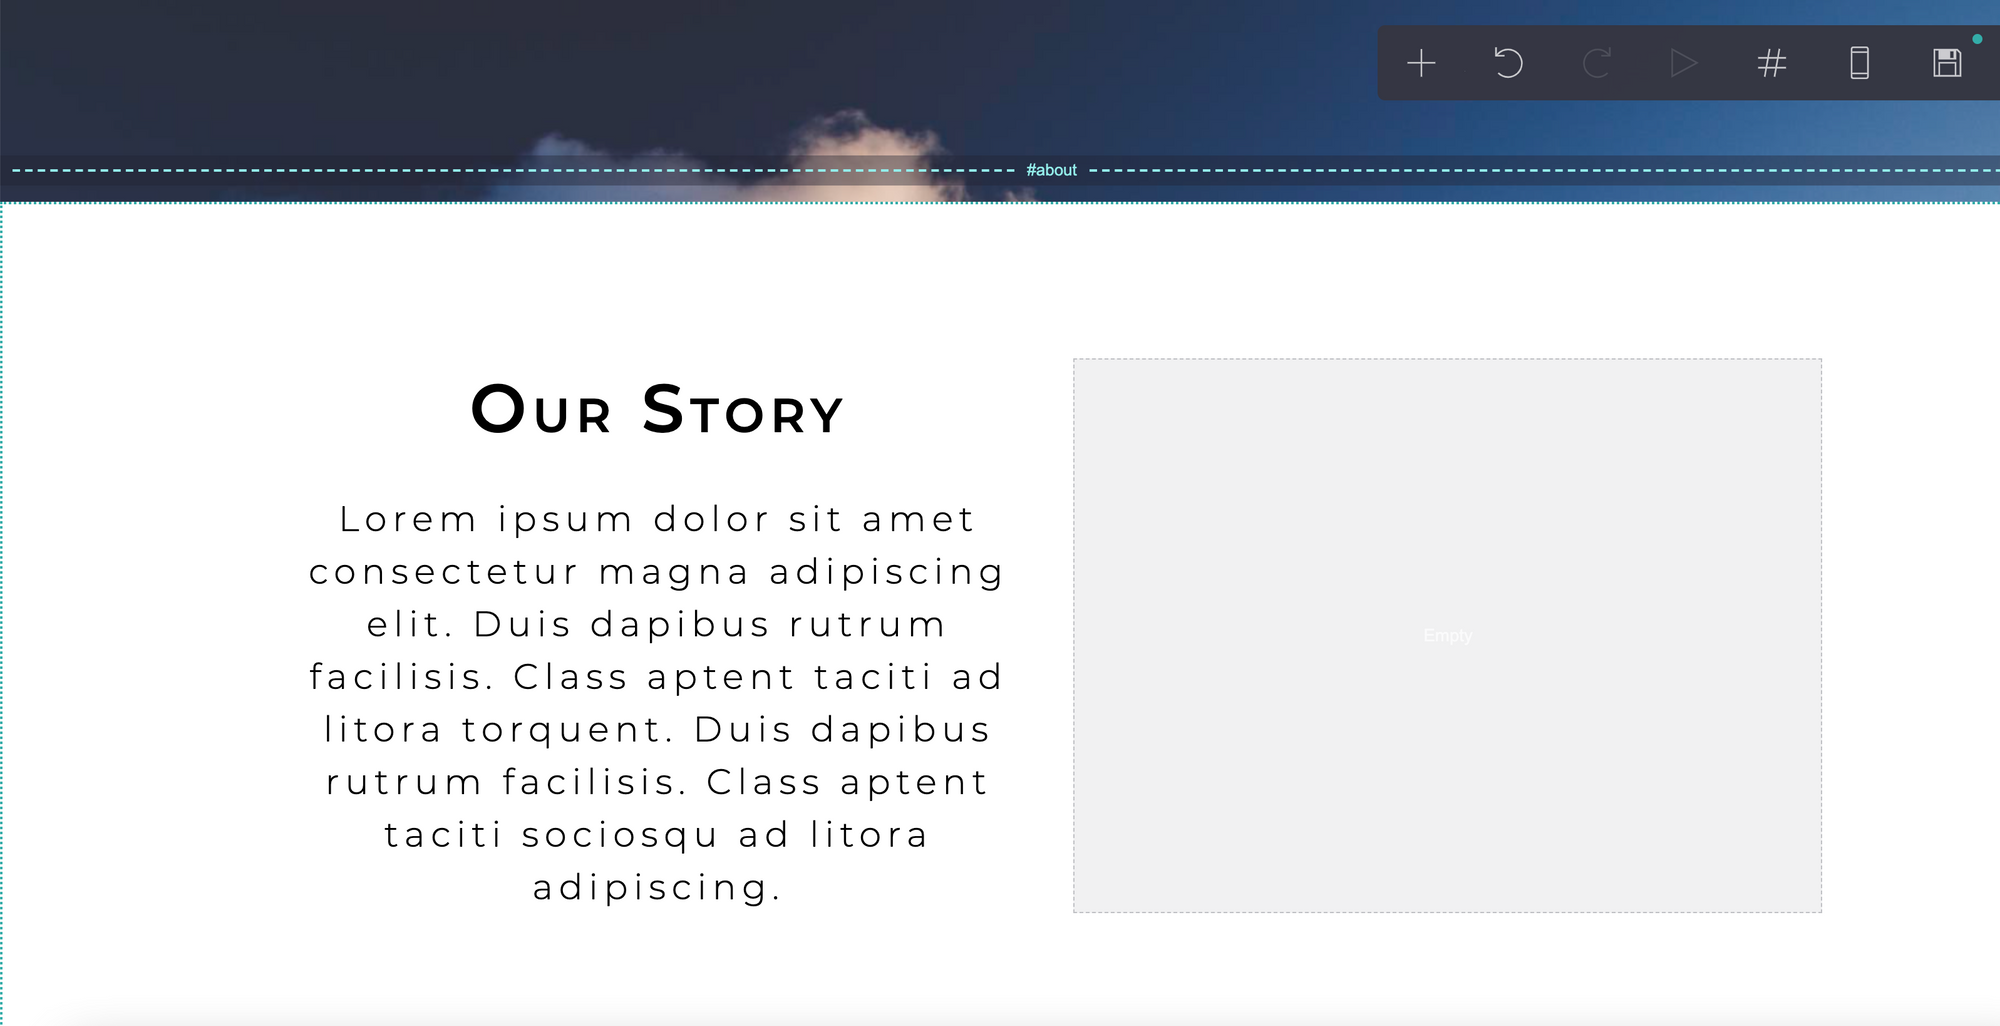
You can change the name of your section and link to it from other parts of the webpage. We are going to name ours 'about'.
Step 10: Add a Multi-Column Container
We're going to add an 'About' section to our website. We can do this by clicking on the page and adding another container right after control. Adjust the width and the height to make the container full screen. In this container, we want there to be two columns. One to display an image and the other to display some text. For this, we will change the container type from Default to Columns.
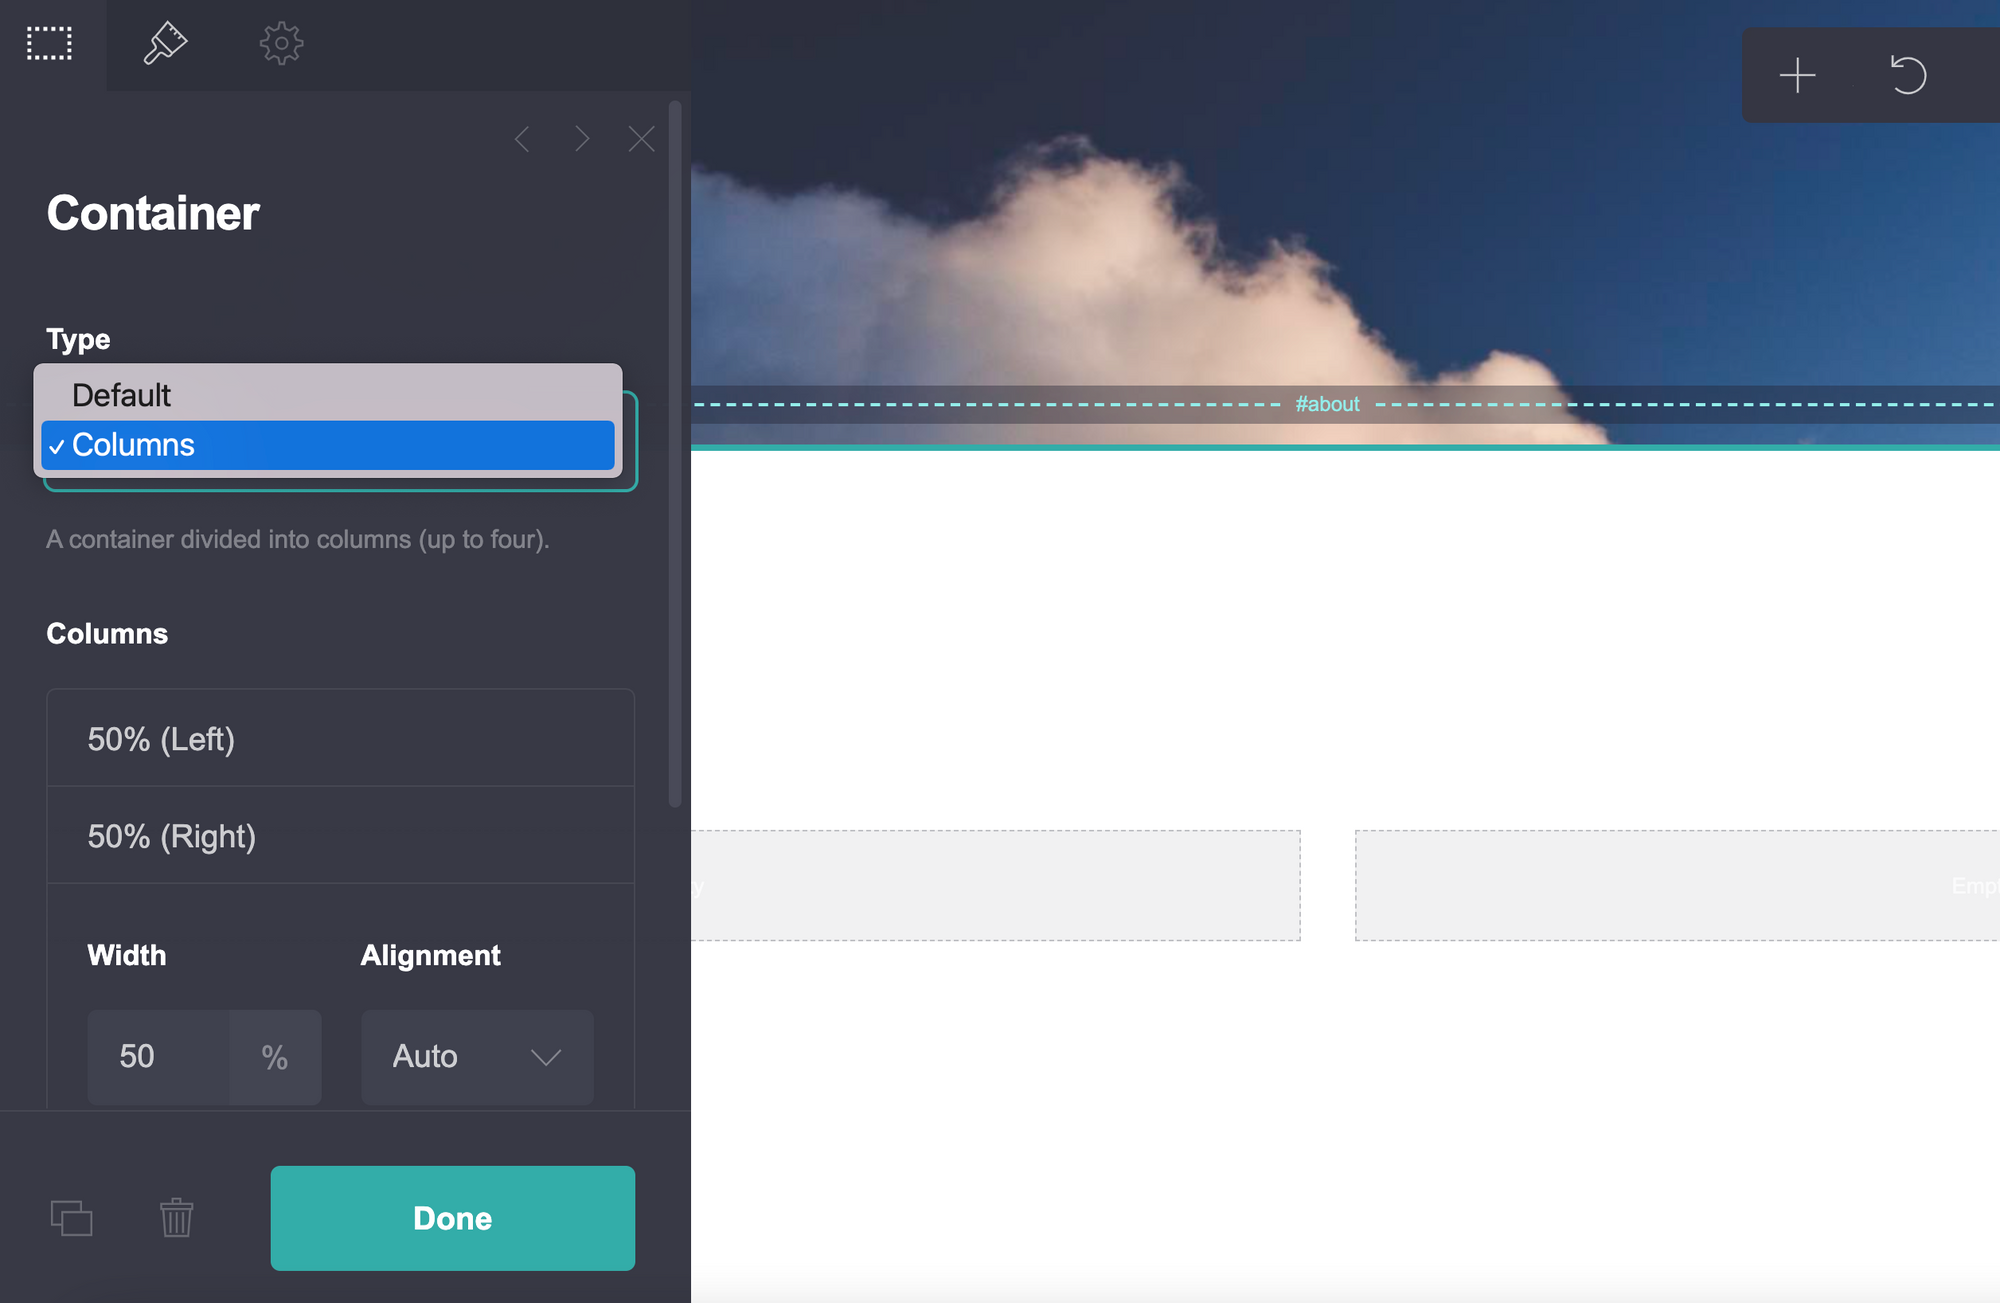
We want our columns to take up the entire width of the container. In the appearance tab (paintbrush icon), we can increase the width of our columns to the desired number.
Step 11: Add Some Text to The First Column
We want to add some text about ourselves in the first column. To do this, click on the grey block that says empty. Then, press the add button and select the text option. Add the text option twice so that you have two text blocks. One right after the other.
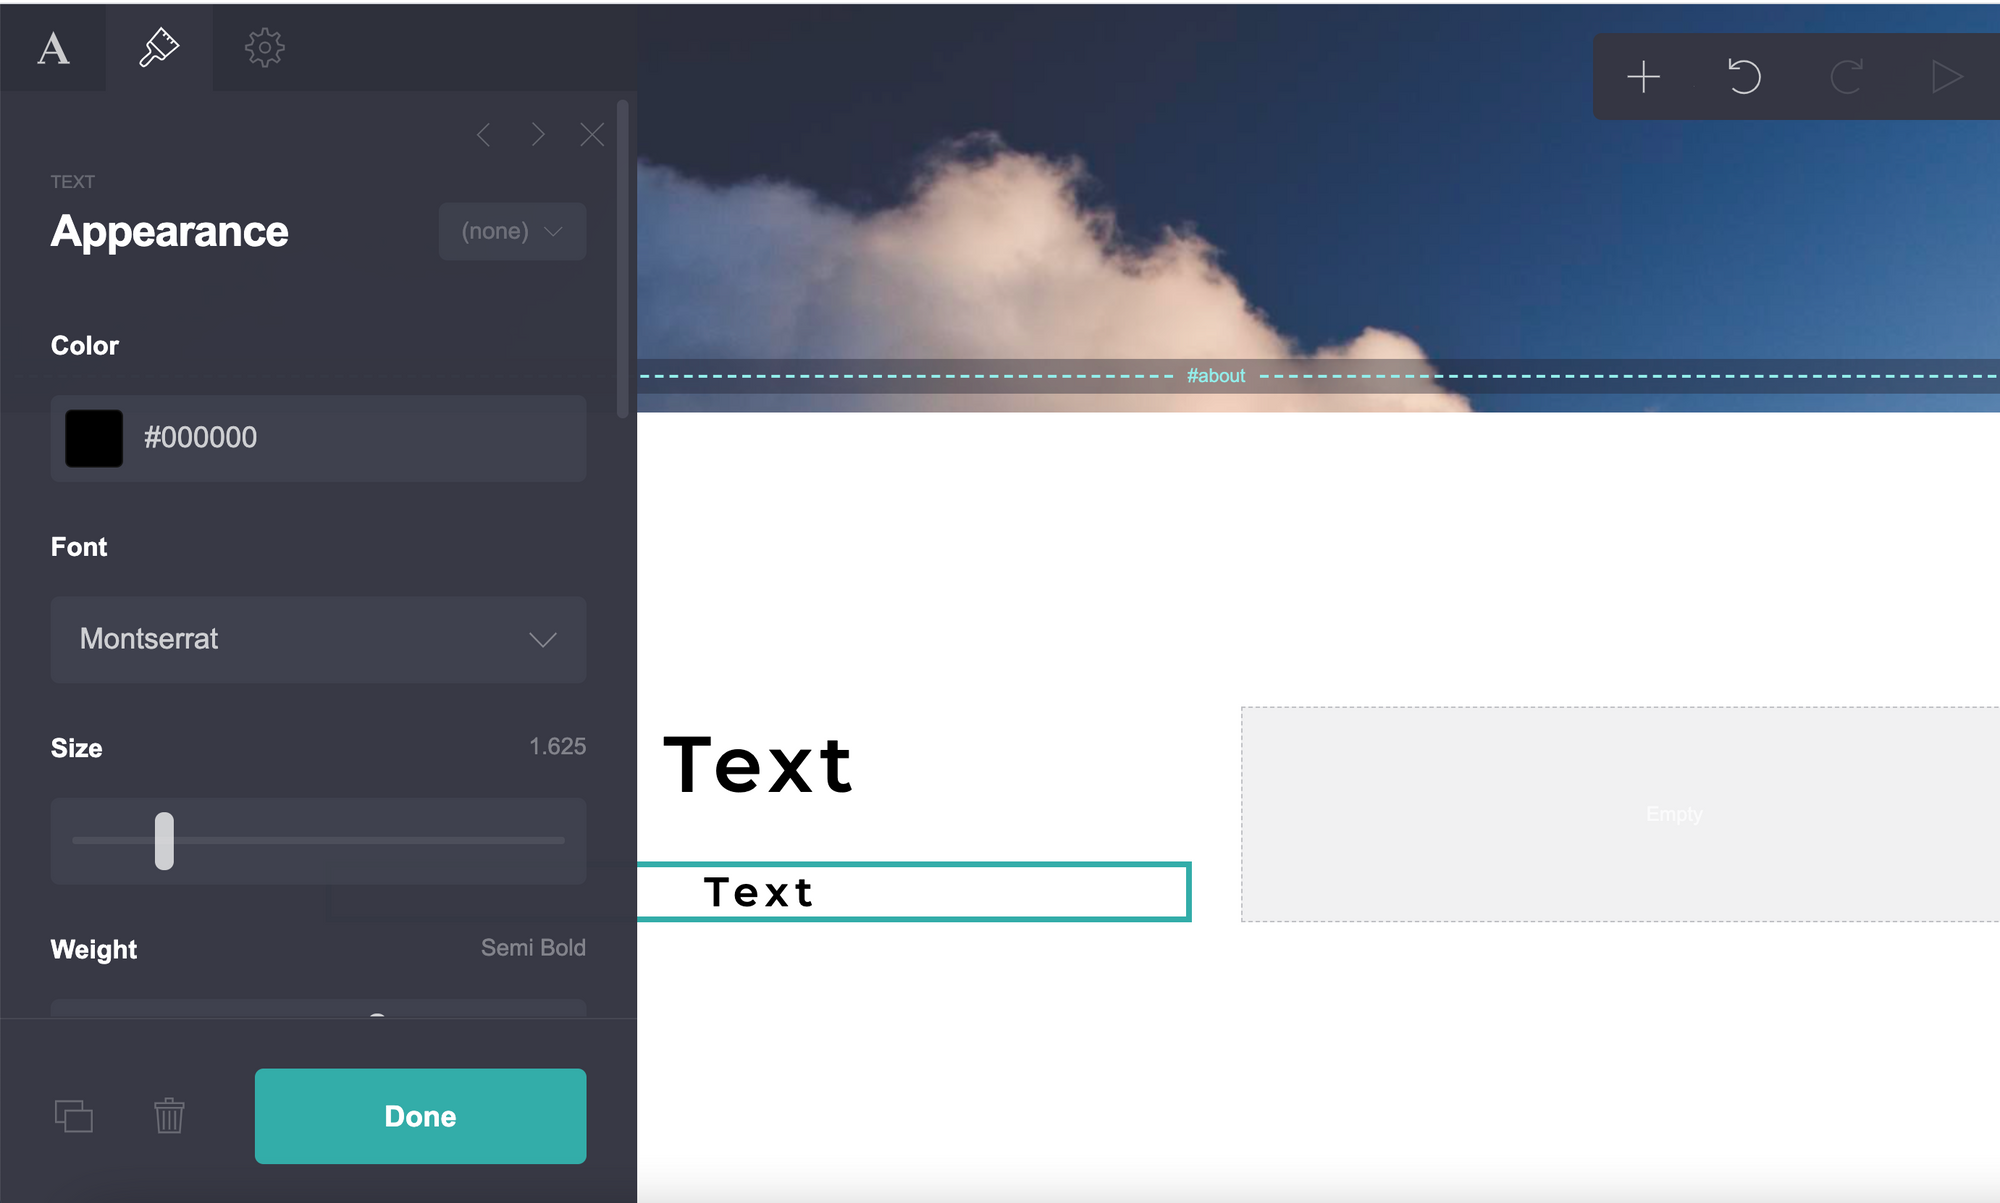
In the first text box, we will add the heading of our section. In the second one, we will add a description. Adjust the text type, size and appearance accordingly.
Step 12: Add an Image to The Second Column
Repeat the steps to add an element outlined in the previous section. However, instead of adding text to the second column, we will be adding an image. Make sure you have selected the second column (the gray portion) when you click the add button. If an element is added elsewhere, just drag and drop it into the second column.
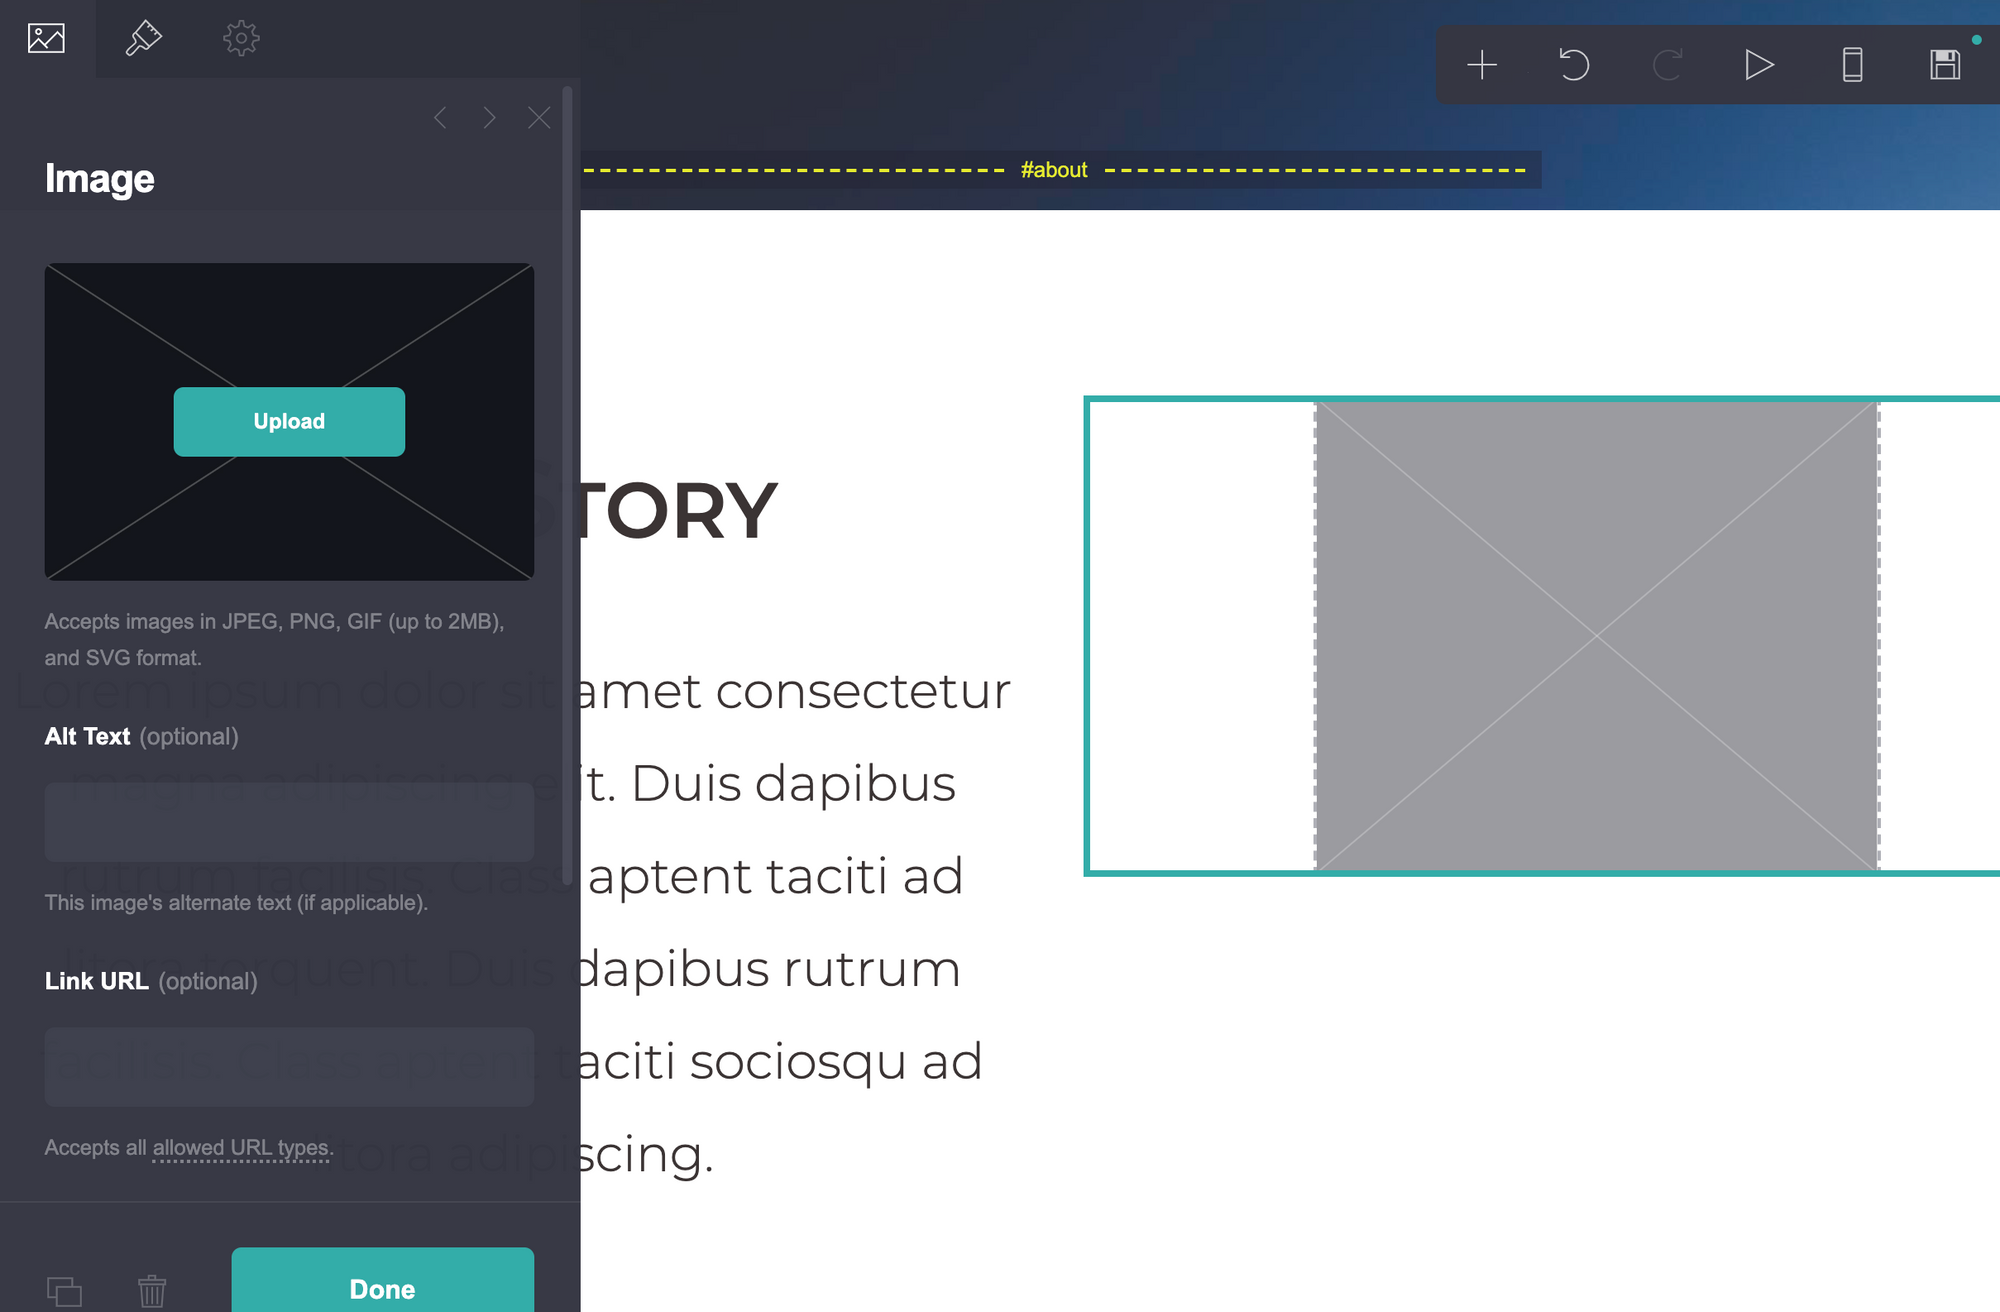
Upload an image using the sidebar on the left. You can adjust the width and height of the image in the appearance tab within the sidebar.
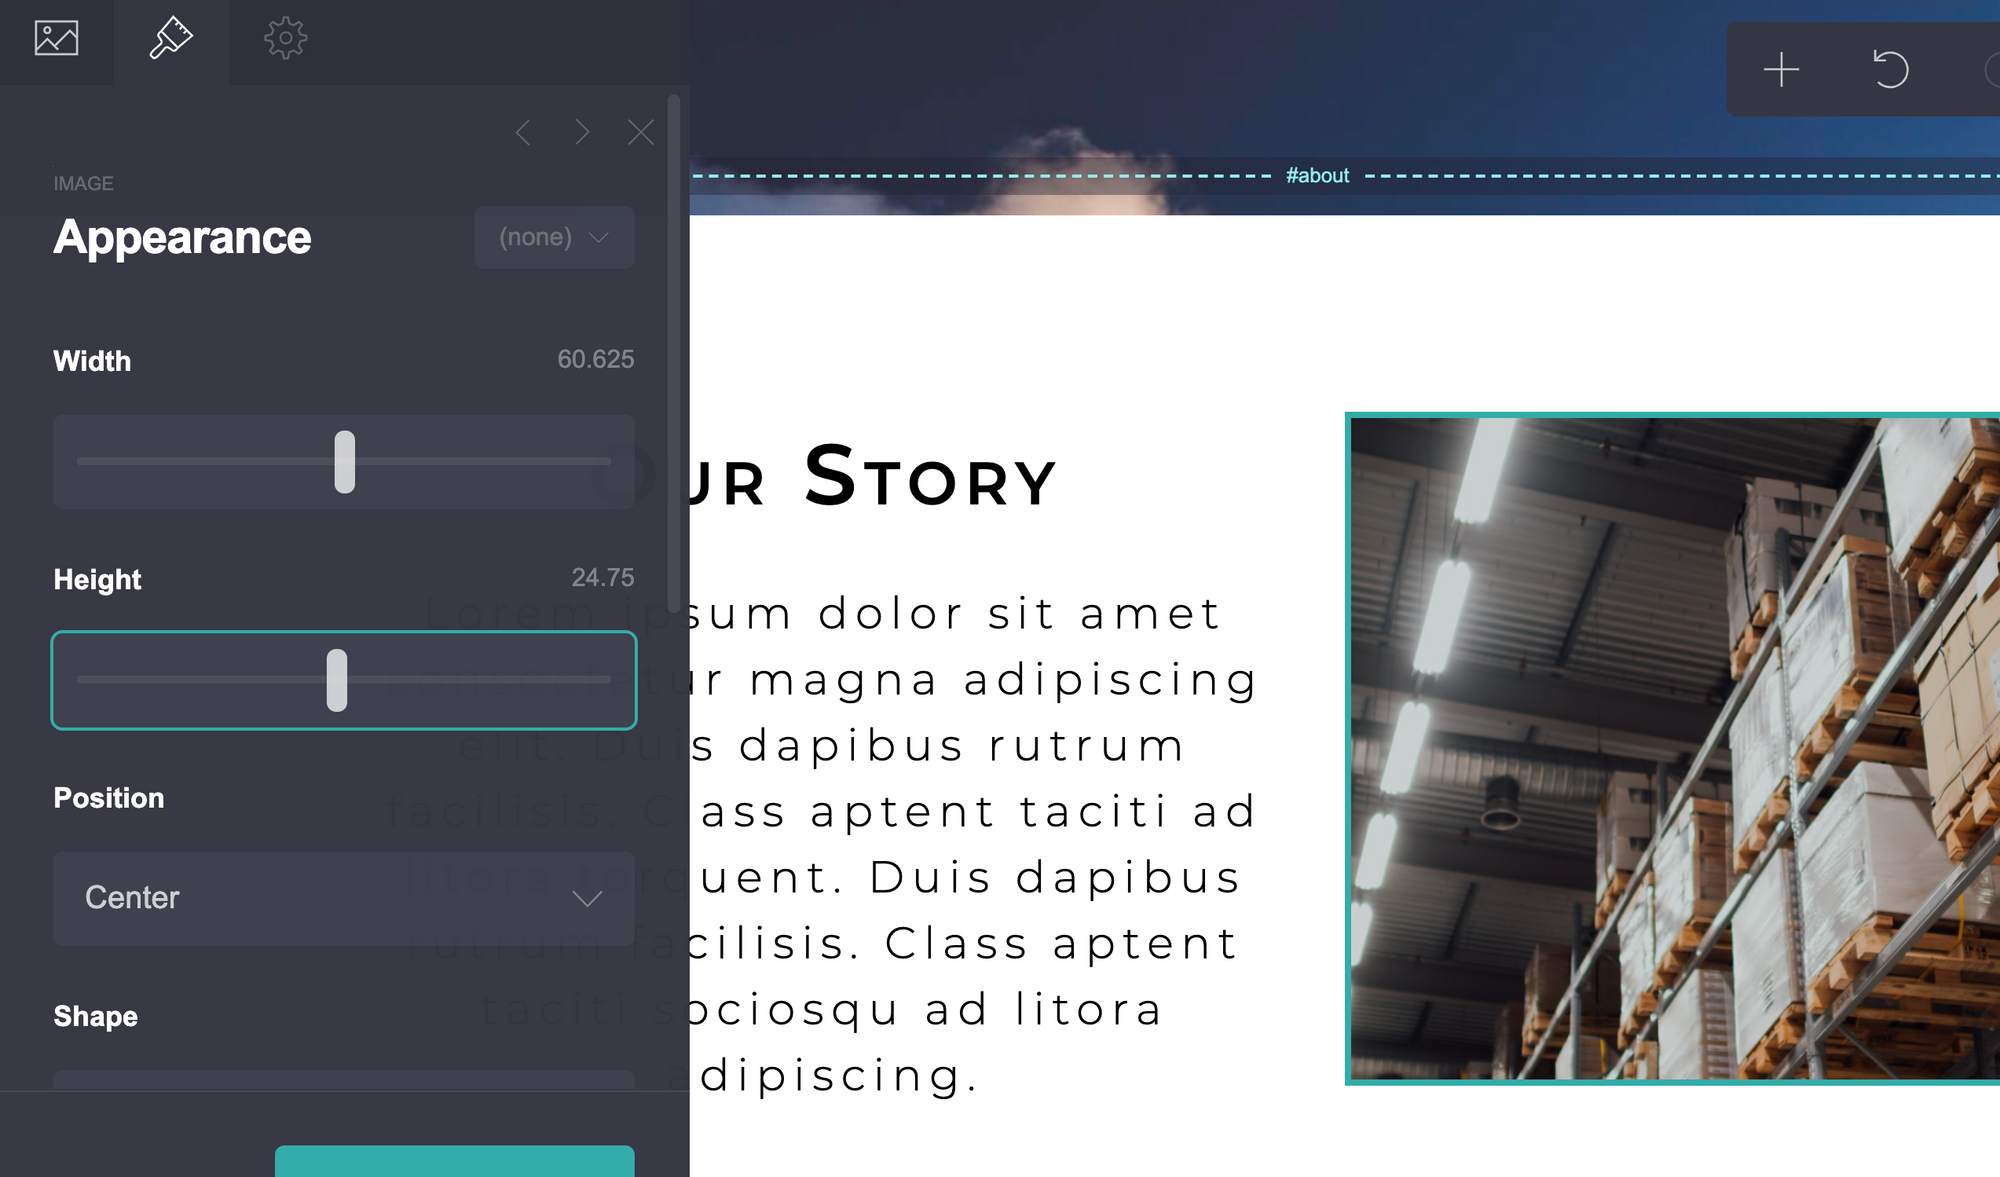
You can also round the image instead of having a rectangular block. Do this by changing the shape to a circle. You might have to adjust the width and height of the image to get a perfect circle.

Step 13: Add More Sections & Create a Project Gallery
You can repeat steps 7 through 11 to create multiple sections within your website. A website generally showcases several different things such as projects, clients, about, and past work.
To add a Project section, you can add a little gallery of clickable images. You can do this by adding another container to your page. Click the add button and add choose the gallery option.
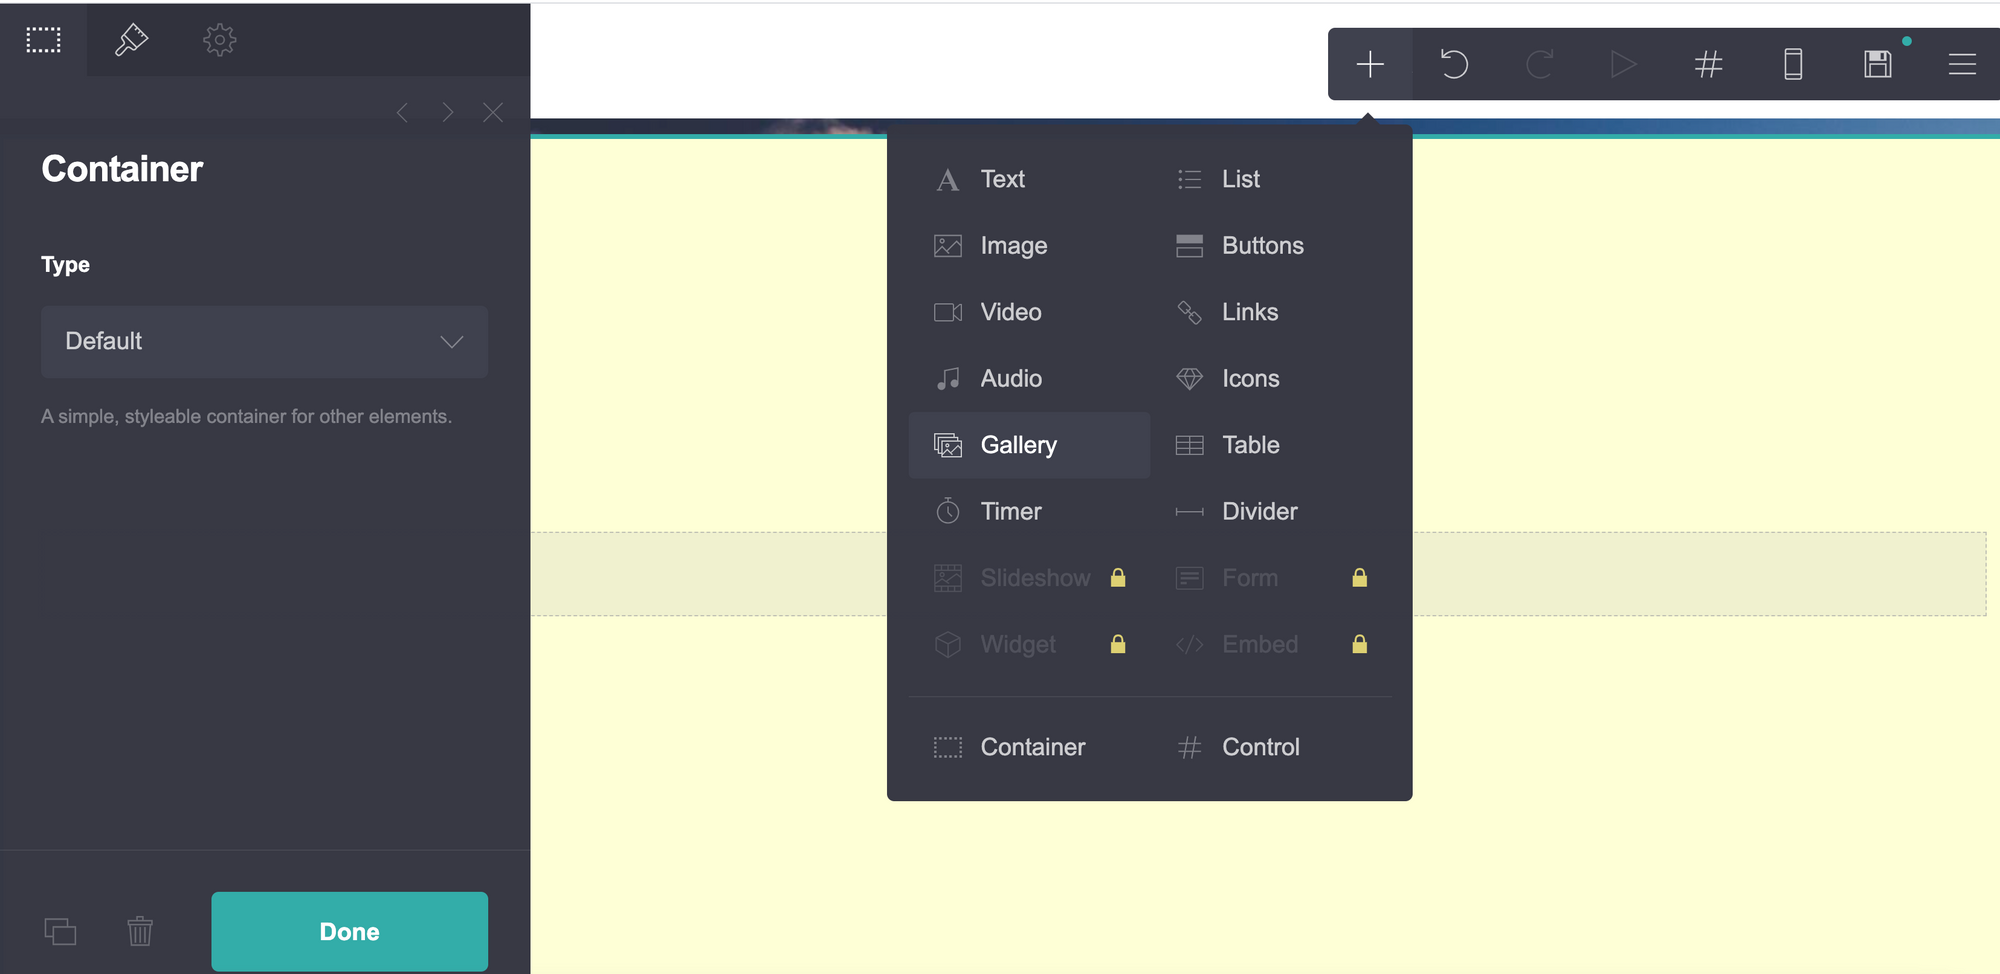
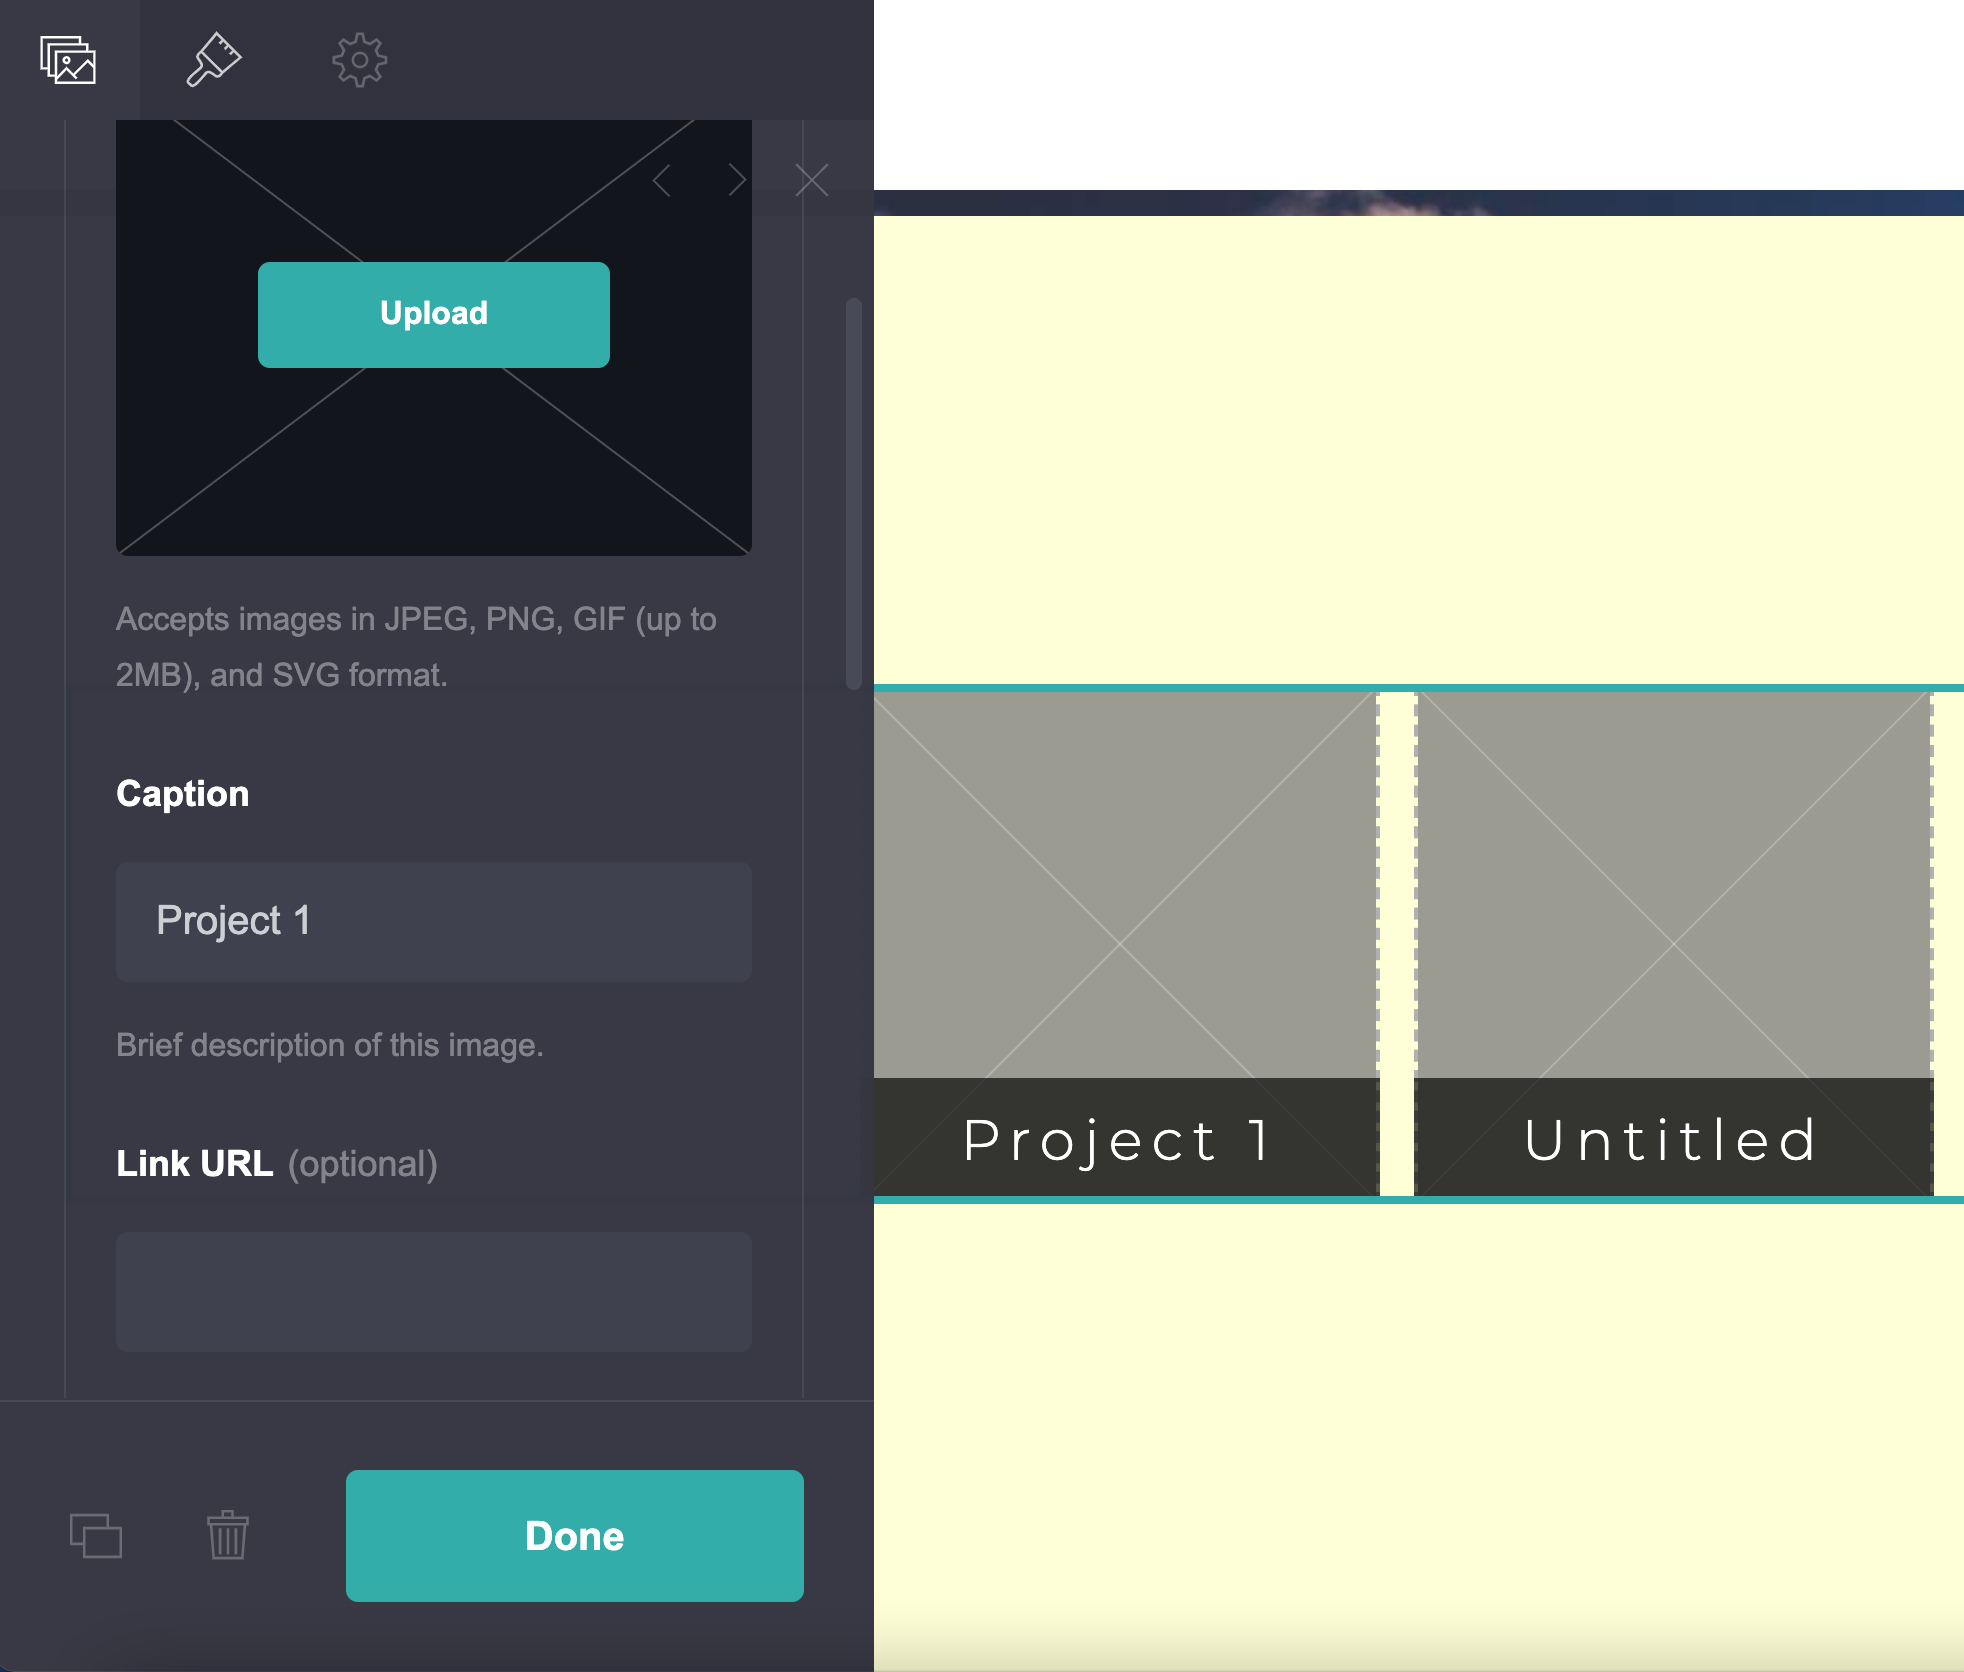
Then, add multiple images to the gallery, depending on the number of projects you have. We will add three image placeholders. We want our images to have captions. We can do this in the appearance tab under captions. Change the style from none to bottom (or wherever you want to display the caption).
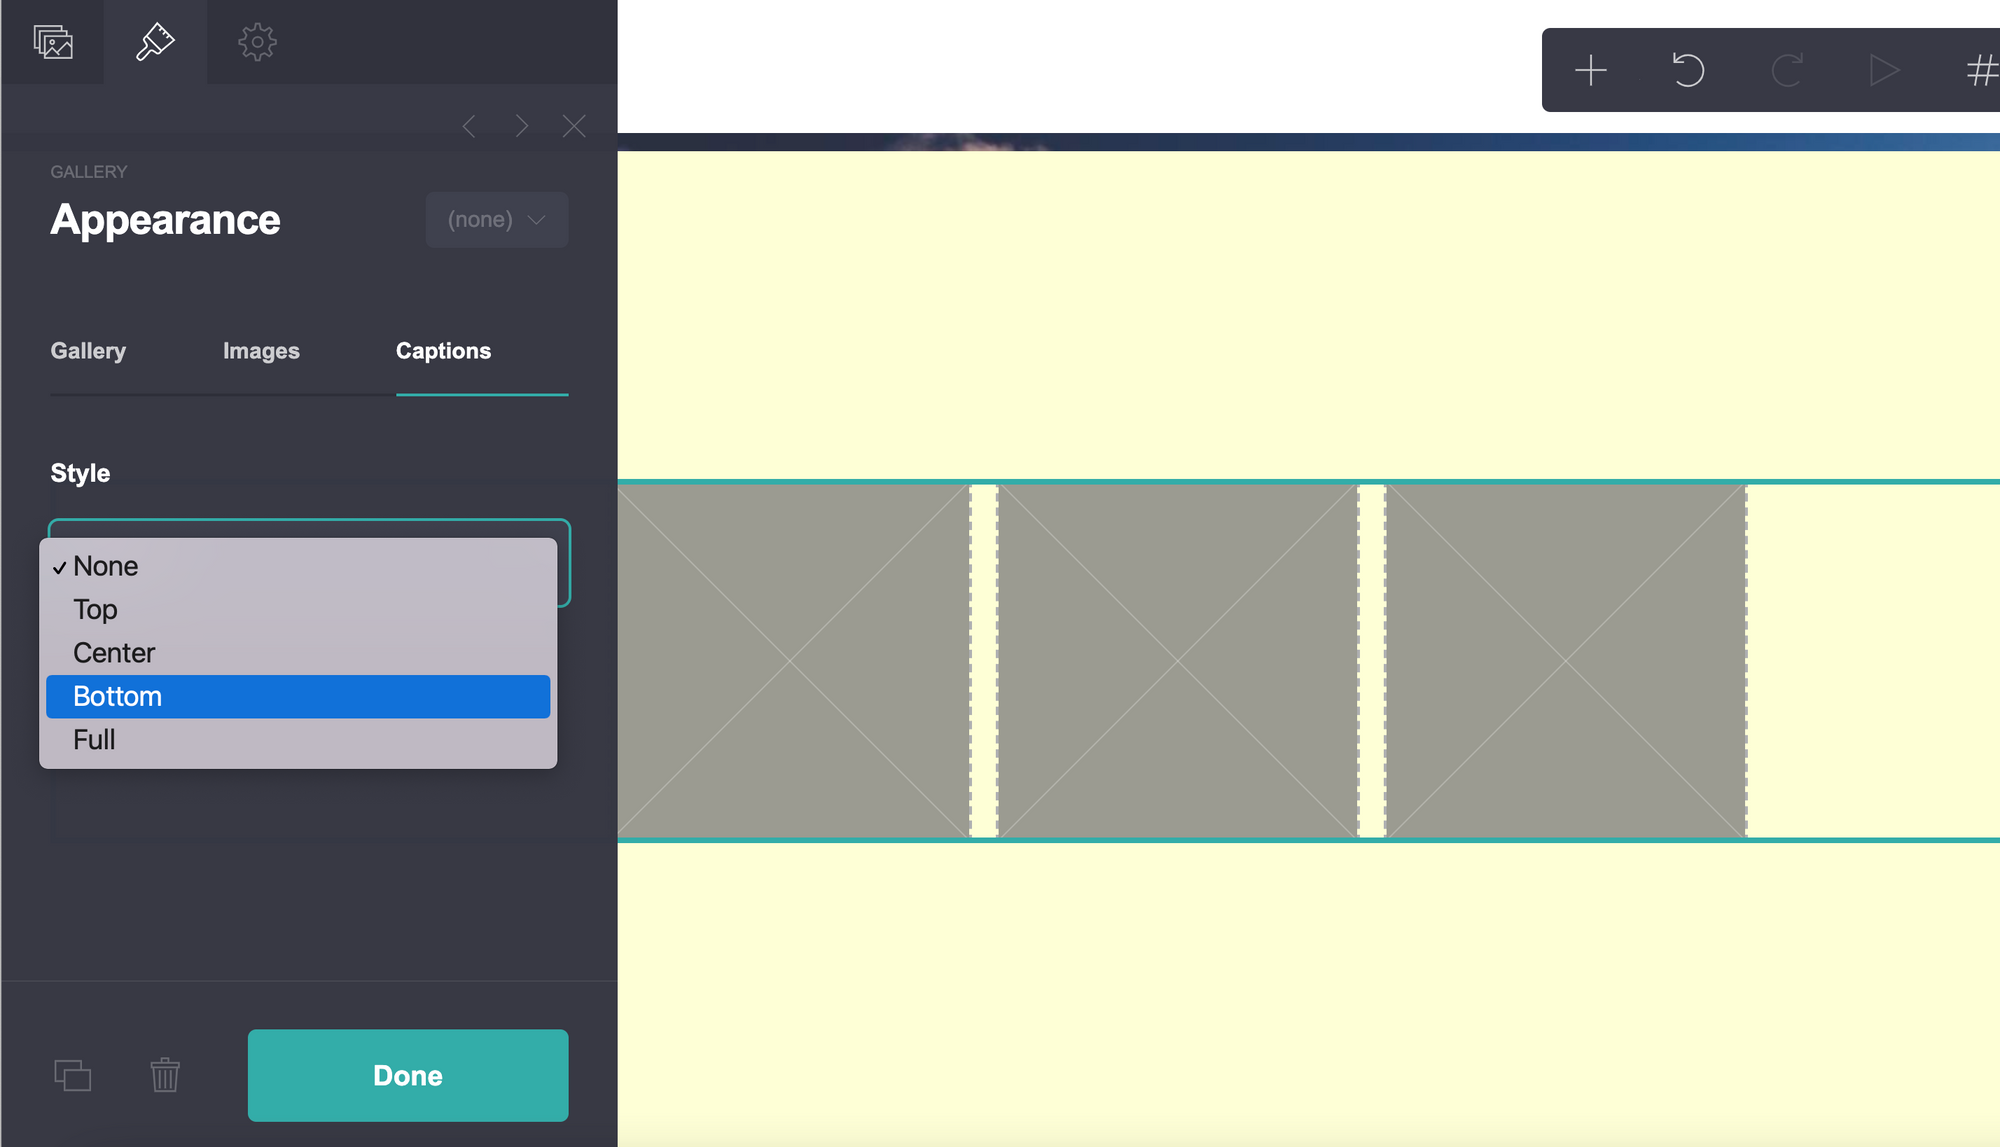
Navigate to the gallery section in your sidebar and under each gallery item, add an image and a caption. You can also convert these to links and point to an external website.
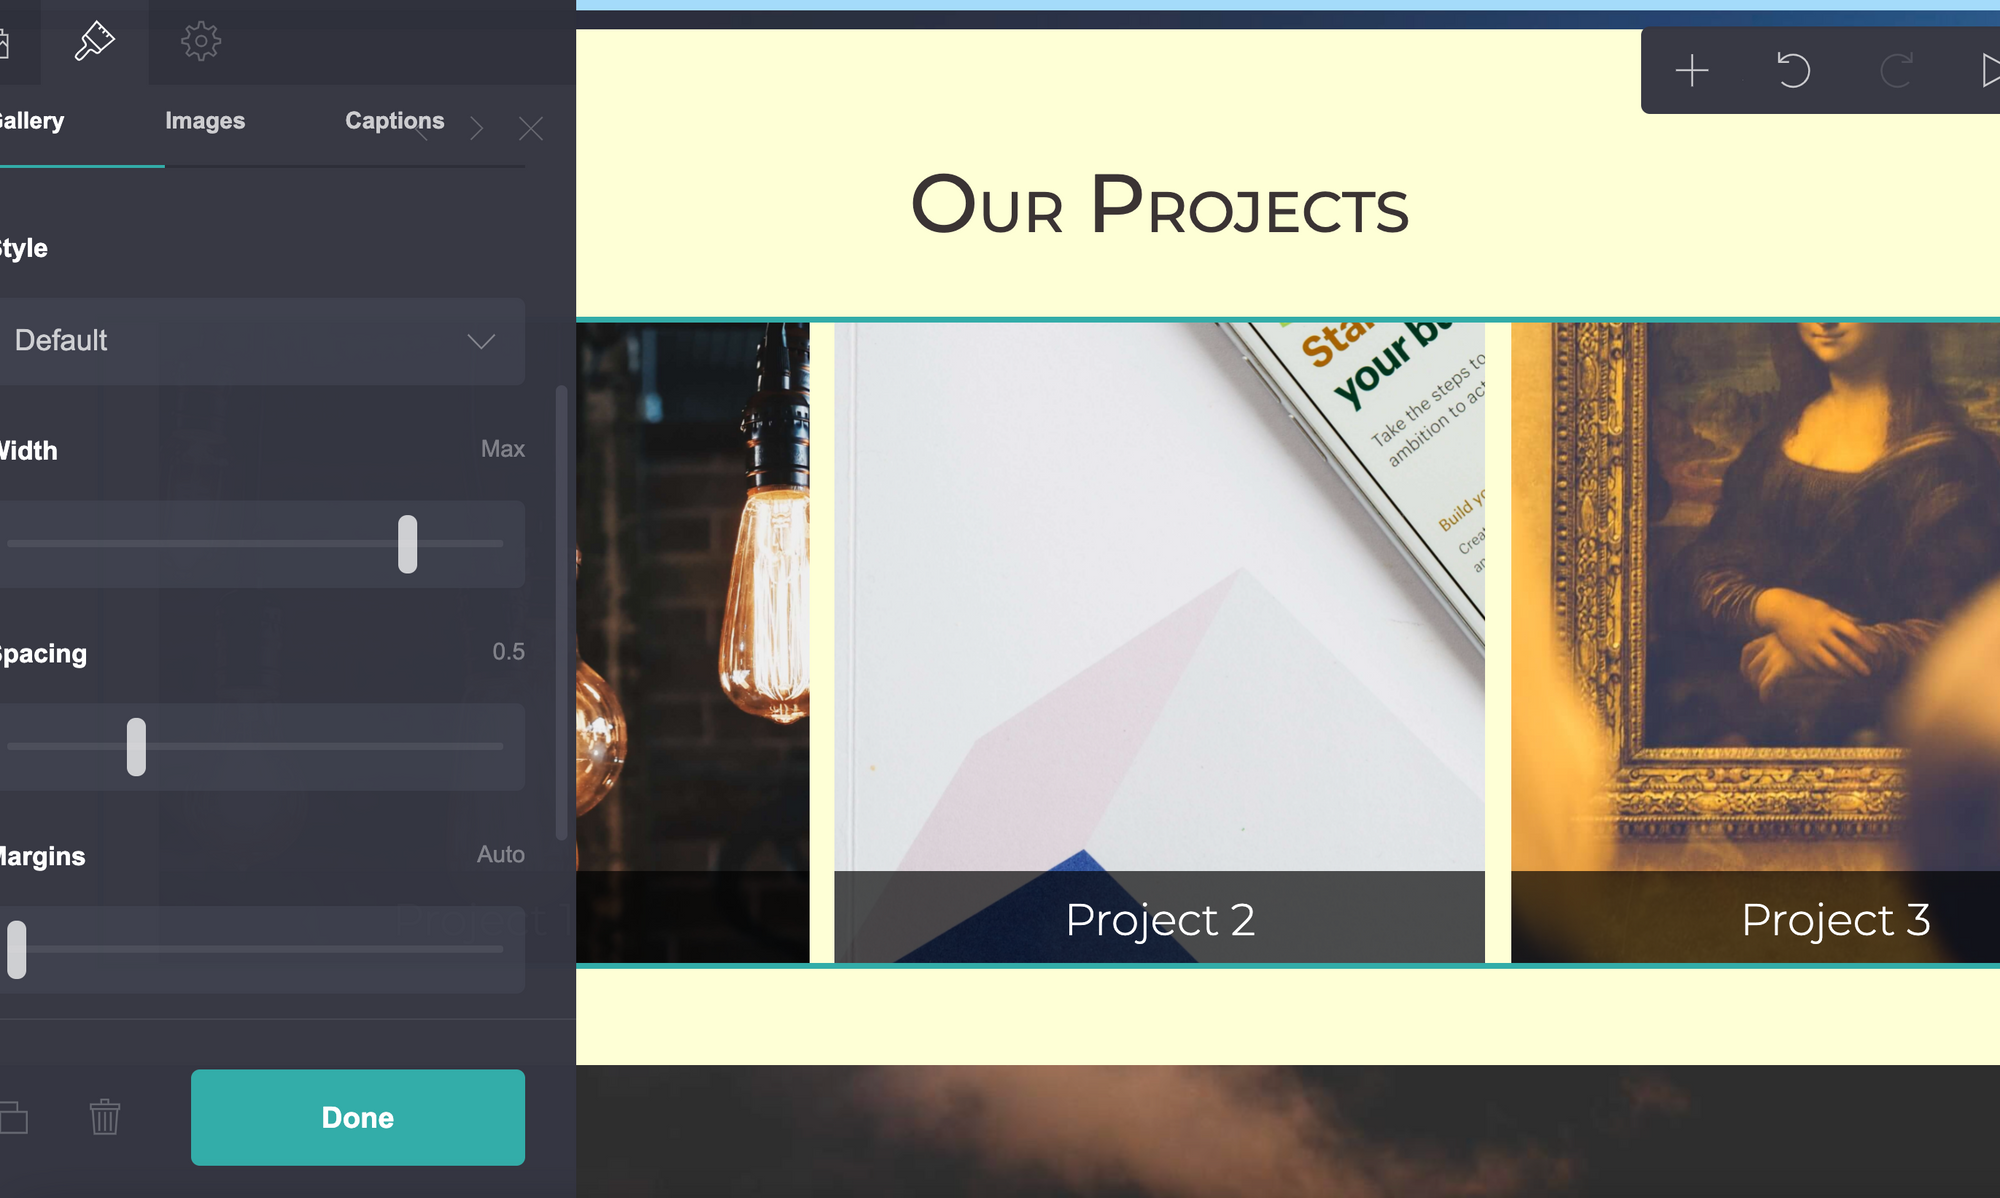
Adjust the width and height under the appearance tab, and you're done!
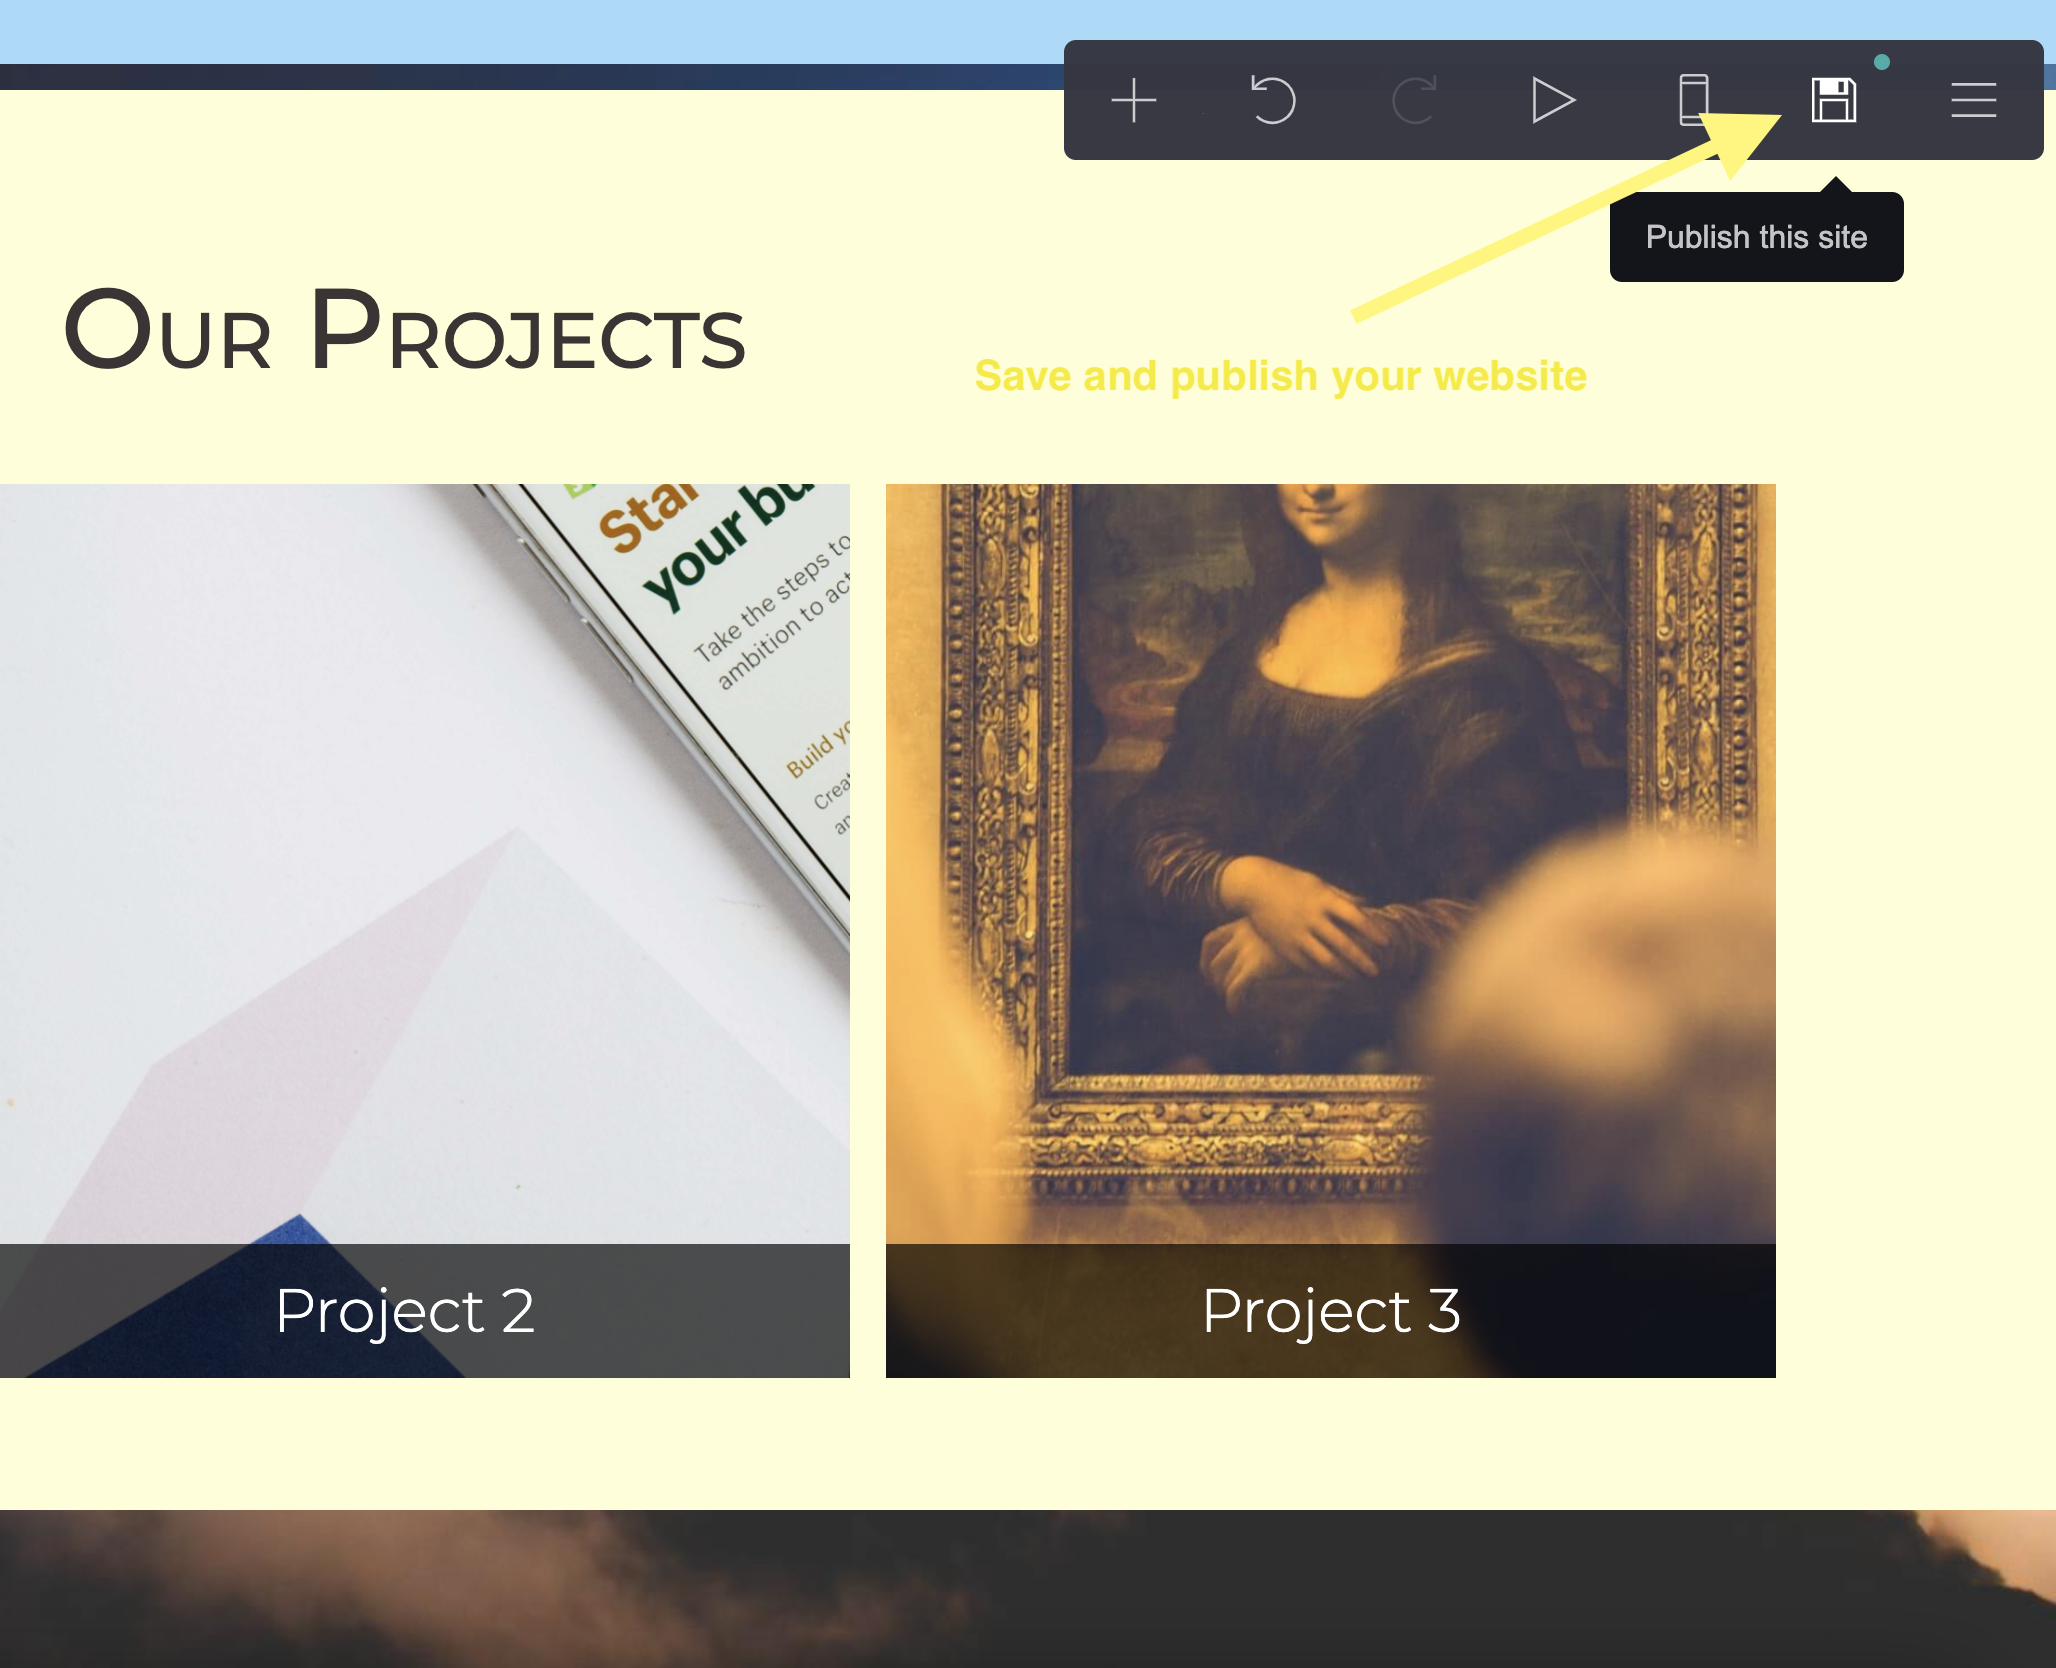
Step 14: Save and Publish Your Progress
If you have followed all our steps, you should have a decent-looking website that you can further modify to suit your needs. It is now time to save and publish your website. Carrd's free plan allows you to publish your website on a carrd.co subdomain.
If you want to publish to your own domain (which we recommend if you are creating a professional or business website), then you might have to upgrade to a paid plan. To save and publish your website, just click on the little floppy disk icon in the top navigation bar. You will be prompted to add a description, title and a URL for your website. Once you're done, hit publish. Congratulations, your website is live!
At the time of writing, Carrd's premium plan costs $19 a year, making it a bargain compared to other website builders.
Bonus Features
There are some other cool things you can do to make your website stand out even further. One example of this is adding animation to your page when it loads.
Adding Animation To Your Carrd Website
To add animation to your Carrd website, select the top layer page section. This should be accessible behind all of your elements and you can access it by clicking the background, outside of the other elements on the page. Then, click on the little play button at the top of the sidebar.
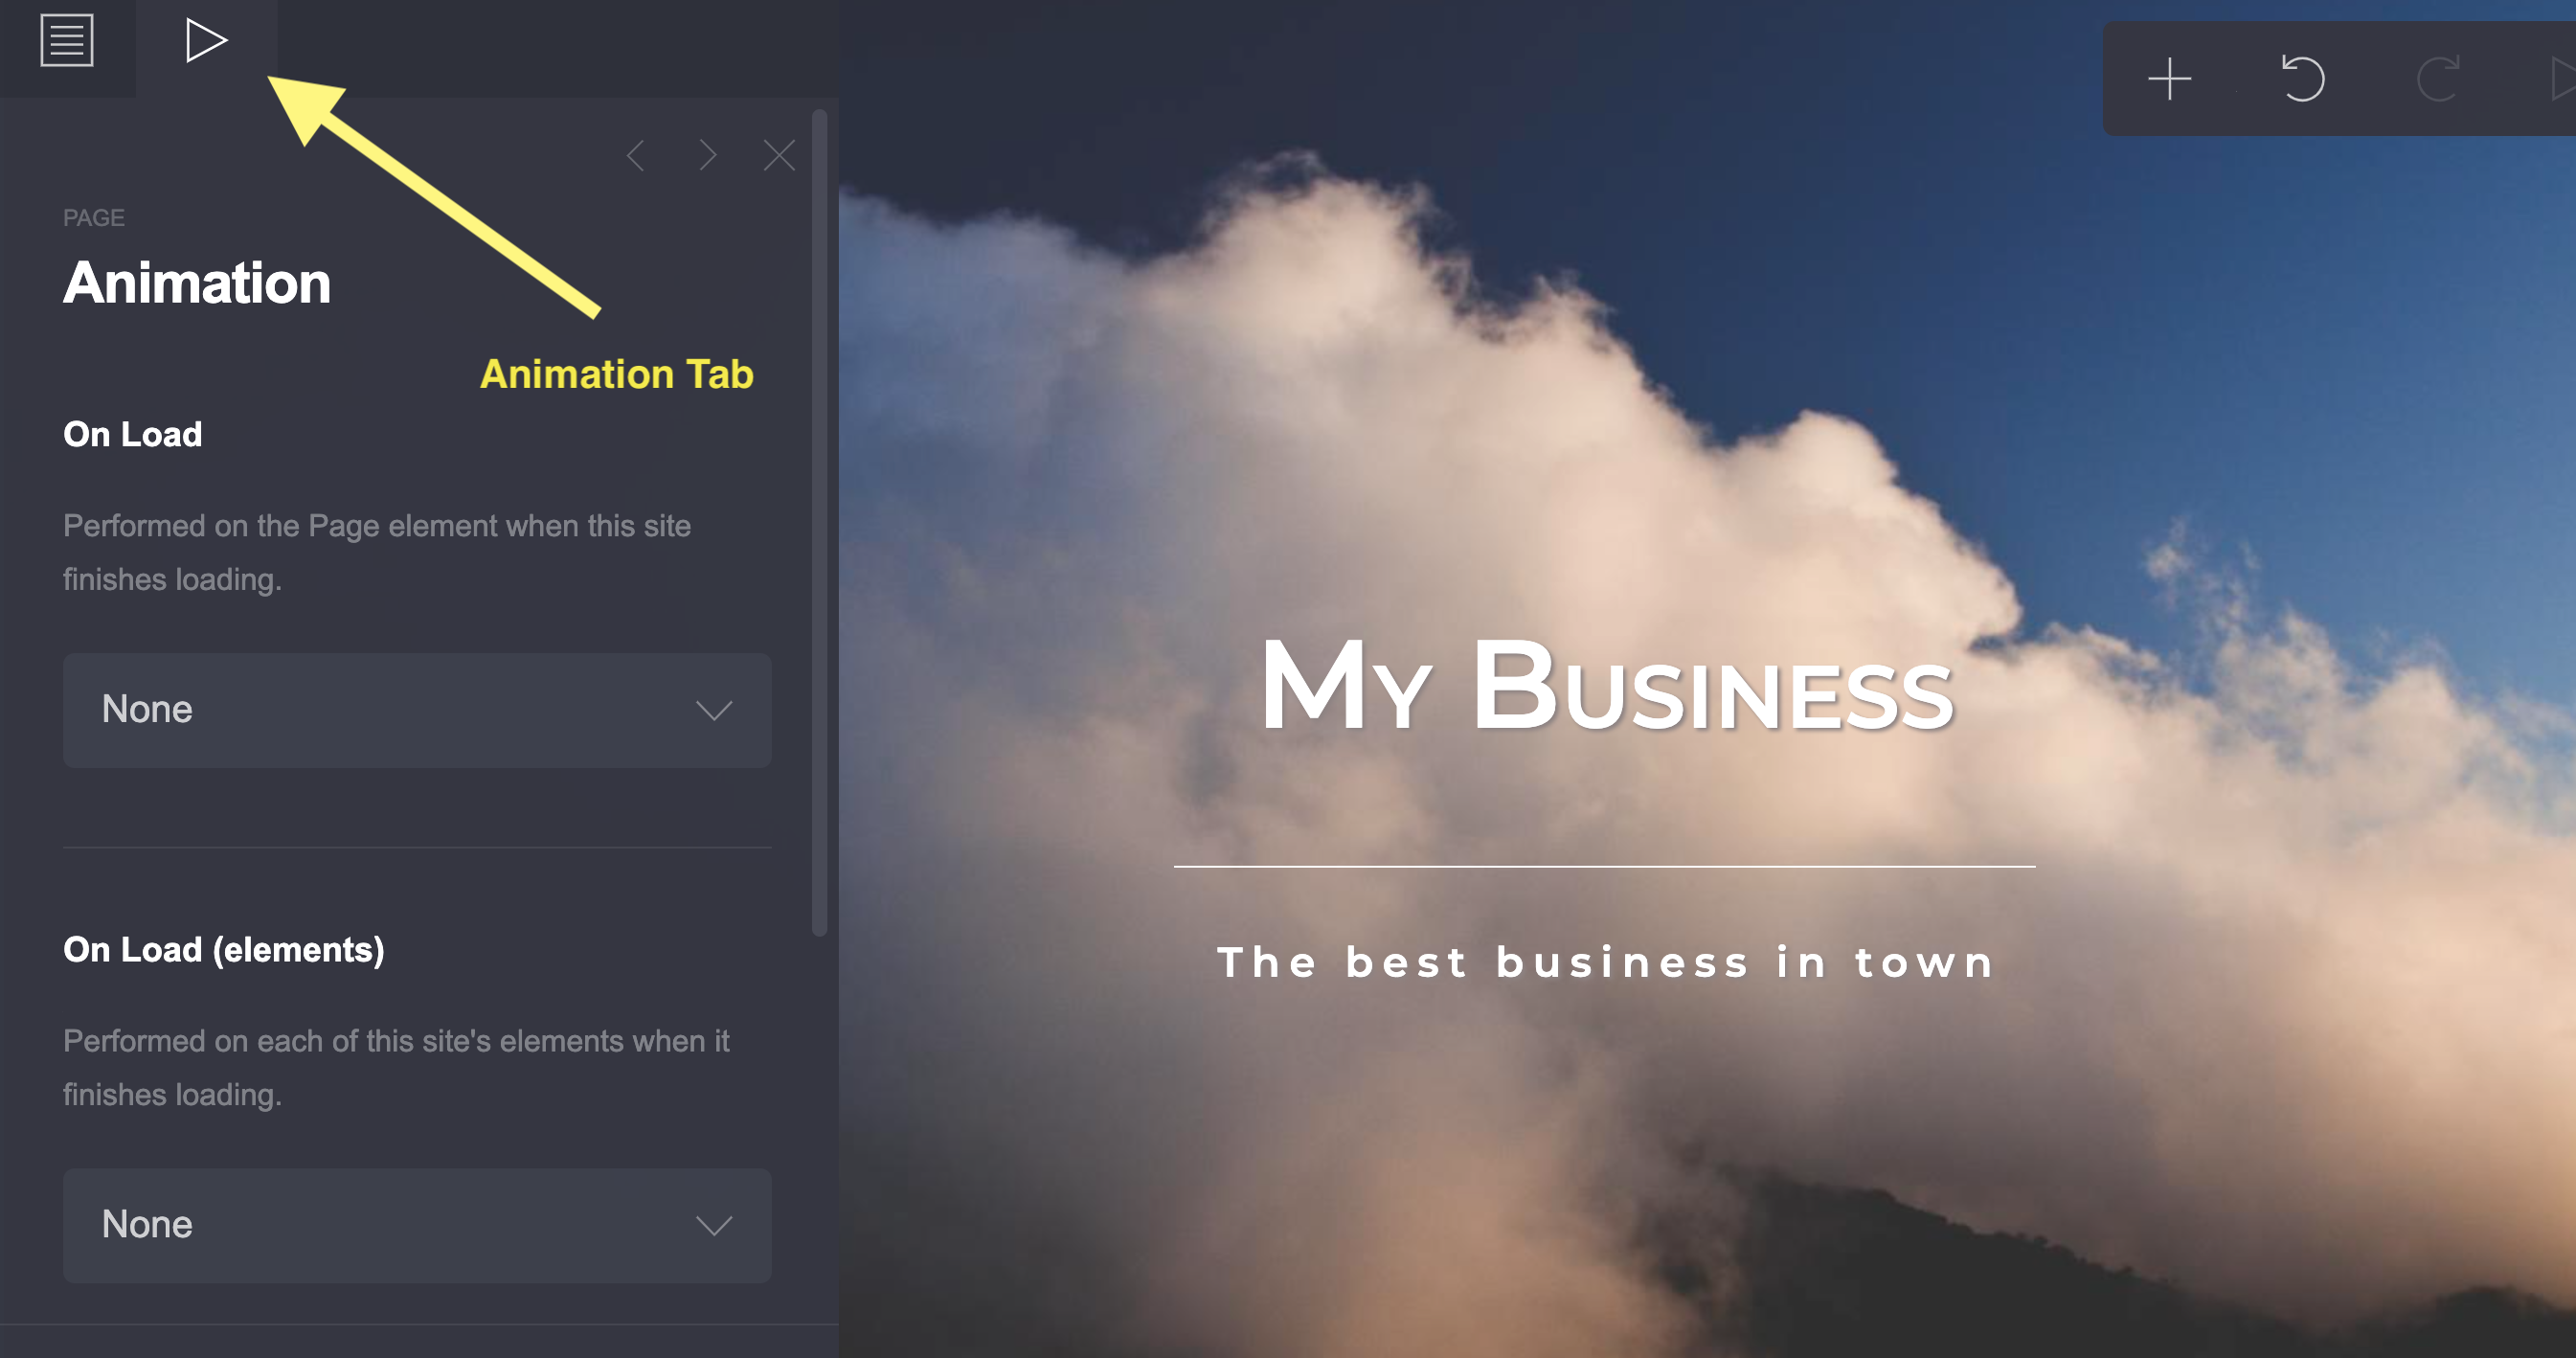
Here, you will be able to add different on-load animations to your page, individual elements as well as sections. You can also set the duration and the delay for your animated elements. Duration is the total lasting time of the animation. Delay is the time it takes for the animation to start after the element becomes visible.
Adding Internal Links To Your Carrd Website
You can also add internal links to your Carrd website. If you will remember, we added sections to our website and gave them names. We can add a little arrow link to the about section from the main landing container.
First, select the container and add the icon element to it.
Change the type to Down Chevron to get a downward arrow. In the URL textbox, input #about. About is the name of our first section and the hash tells Carrd that we are linking to an internal section.
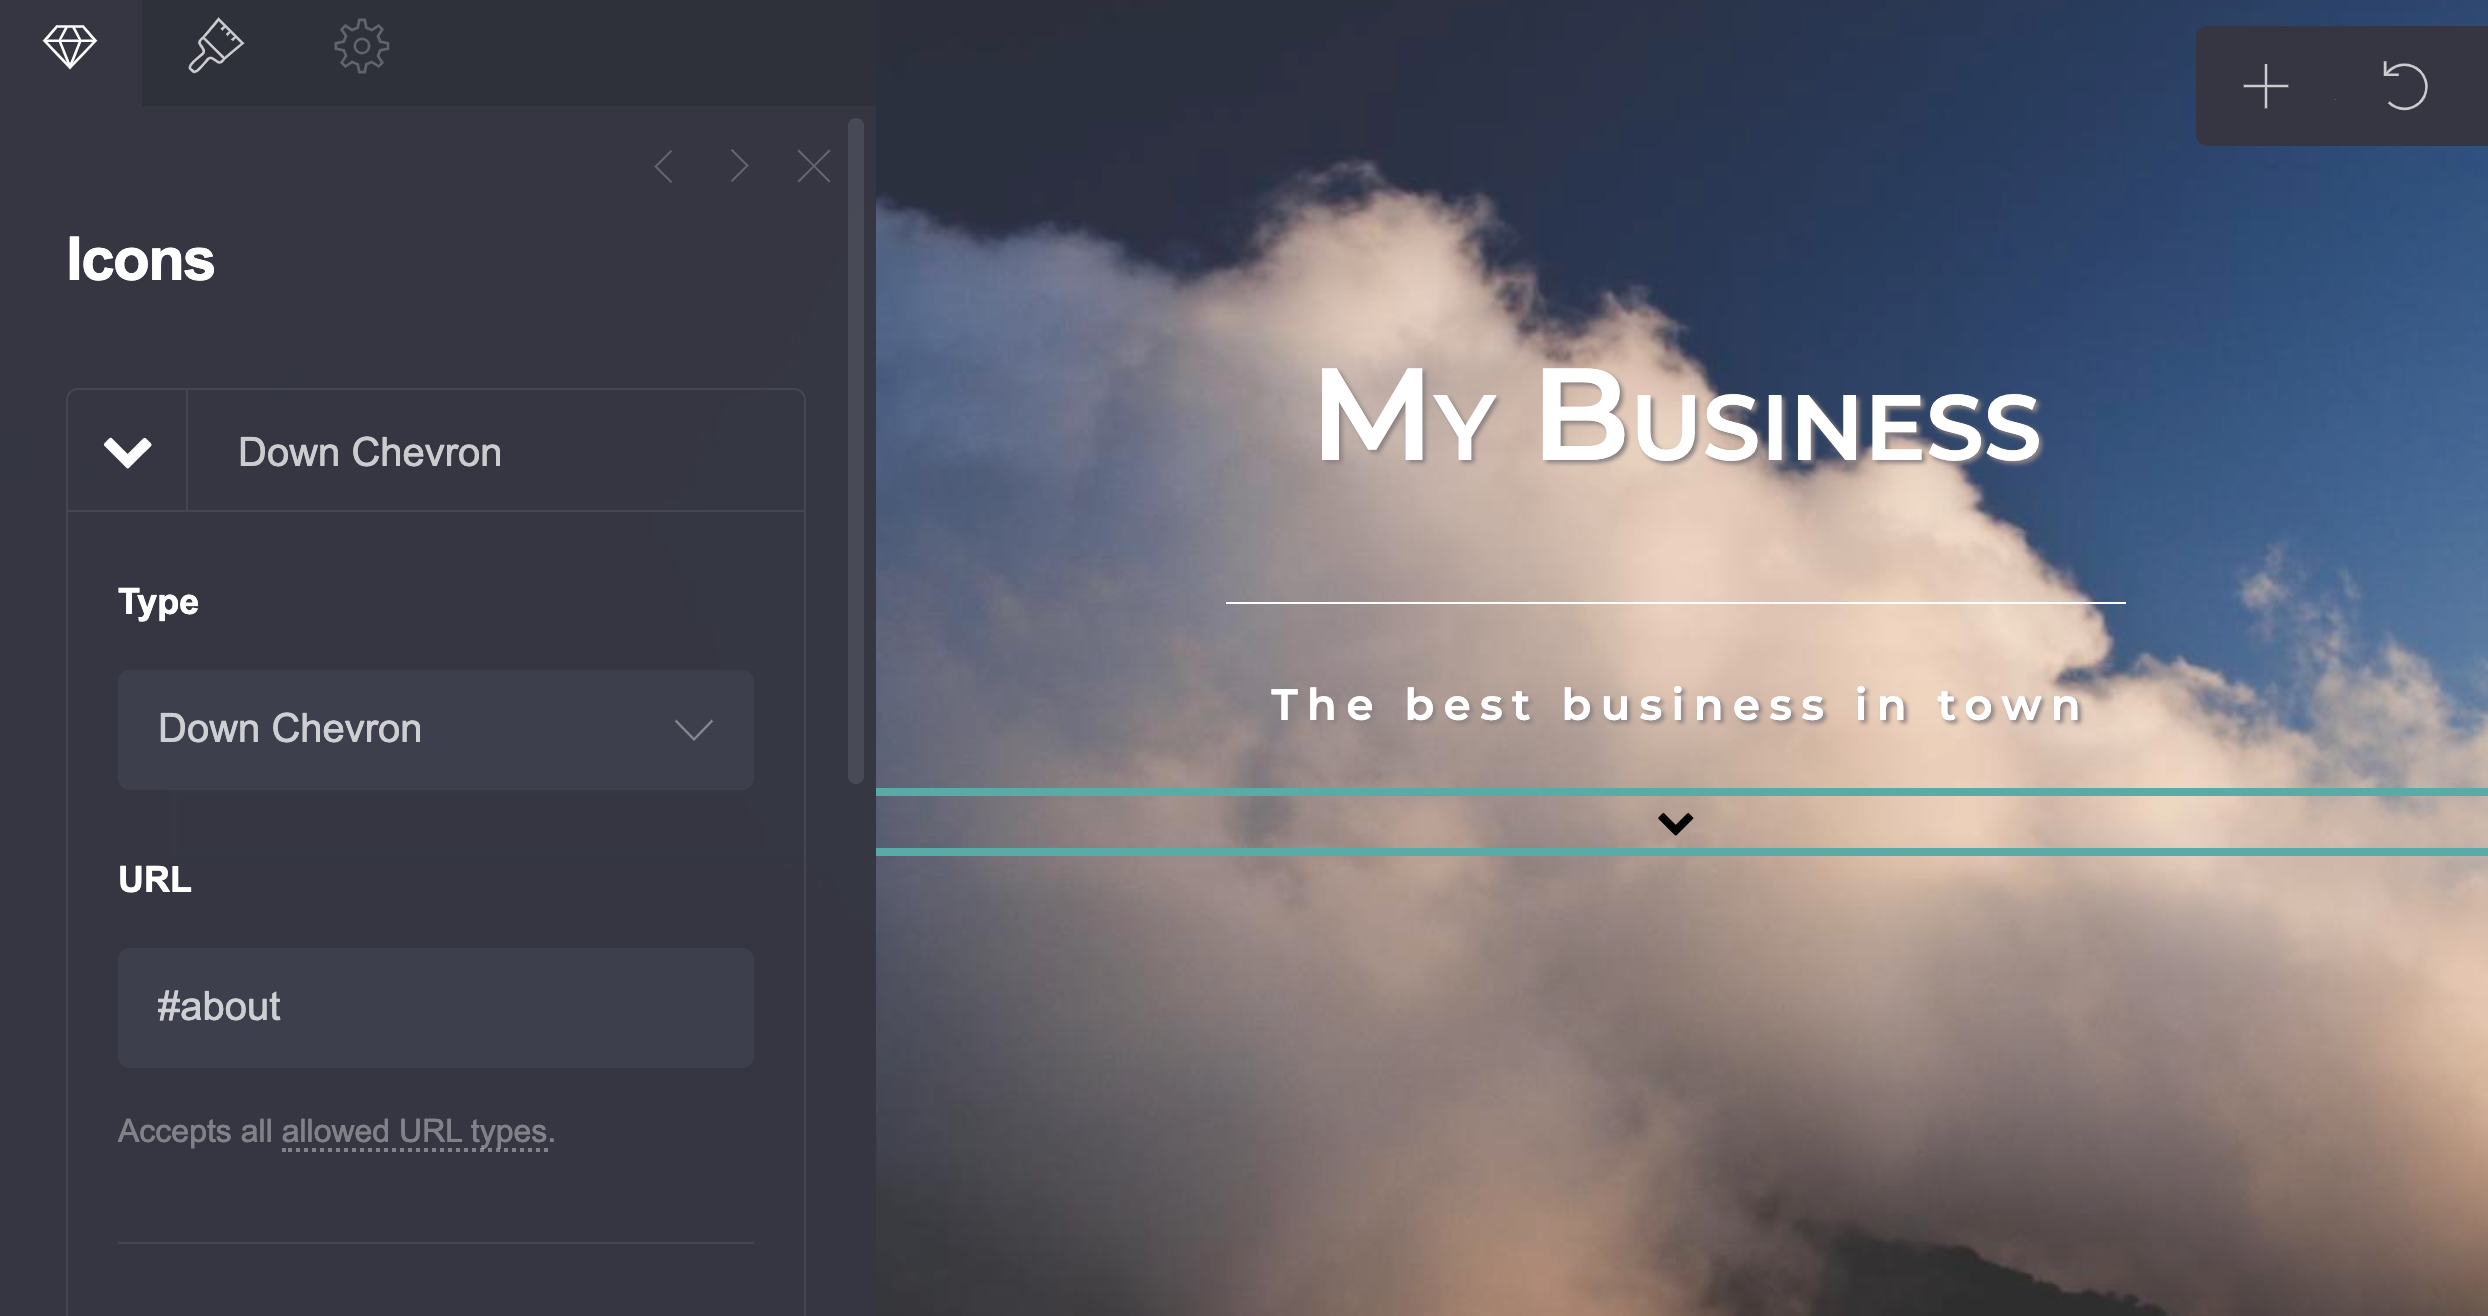
If you want, you can add hover effects to the icon. You can also modify the size and the color of the icon to match your website. Save and republish your changes. Reload your website. Now, if you click on the chevron you should auto-scroll down to the Our Story (about) section. You've added an internal link!
If you've followed this tutorial step by step, you should have a neat-looking website that you can modify according to your needs. Carrd's premium plan comes with even more features such as forms and integration with third-party software like Stripe (to process payments), and Gumroad. You can also add custom domains to your website.
Carrd has extremely comprehensive documentation that you can dig through to add even more features to your website that we may not have covered in this tutorial.
If you're looking to create a website with more complex features, we have written a guide that compares the various different website and landing page builders, to help you choose the perfect fit for you!
 The Uptide