How To Screenshot on HP Laptops & Desktops: 3 Ways

At work, you may need to snap screenshots to communicate ideas with coworkers, solicit assistance by showing an error screen, or rapidly discuss your project progress. You may also be required to snap screenshots in some positions.
There are various times when you need to snap screenshots even during your own screen time. For example, while purchasing something on Facebook, you may need to snap a screenshot to communicate with the seller, you may need to screenshot a financial transaction for proof, or you may want to keep an outstanding home décor concept you spotted online.
Even though taking screenshots in Windows is simple (simply press Windows+PrtScn), the default function is limited. There isn't a robust editing tool available, it lacks many automation functions, and obtaining screenshots in many methods can be difficult.
If you need to capture screenshots frequently, you'll need to invest in third-party screenshot software that meets all of your requirements. These apps can let you take screenshots in a variety of ways, store them automatically (online/offline), and annotate them using advanced editing capabilities.
There's a multitude of ways with which you can take screenshots on HP laptops. Here are some of our favorites.
Related: How To Screen Record on HP Laptops
 The Uptide
Method 1: Native Screenshots in HP Laptops
The easiest way to take a full screenshot is by using the Print Screen key that comes built-in in all HP laptops. Often abbreviated as PrtScn or Prt SC, it is located at the top right of your laptop keyboard. To take and save a screenshot with Print Screen, simply follow the methods outlined below.
- First, press the PrtScn or PRT SC key along with the Windows key to capture a screenshot of the entire screen.
- Once you've done this, the screenshot will be copied to your clipboard (instead of being saved to drive).
- To permanently save your screenshot, open any image editing program such as Gimp, Photoshop, Paint, etc.
- Paste (CTRL + V) your screenshot from your clipboard onto your document. You can also right-click and select Paste from the dropdown menu.
- Once you have your screenshot, save the file with an image extension of your choice (such as PNG or JPEG), and you're all done!
Method 2: Snipping Tool For Full and Cropped Screenshots
The snipping tool is a multi-purpose built-in screenshotting tool in all HP laptops. It allows you to create free-form snips around any object, rectangular snips, screenshots of the entire window, or limited to just a dialog box.
#1. To open the snipping tool, press the Windows logo key + Shift + S (if you're on Windows 10 or higher). Else, search for the snipping tool in the search bar.
#2. Once the snipping tool is open, you can choose the Mode you want to snip in, and define the area and size of the screenshot.
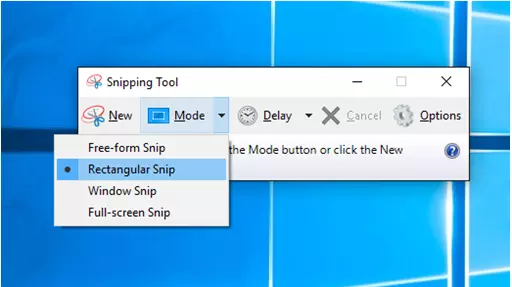
#3. The screenshot will be auto copied to your clipboard, and a dialog box will open up. Click on this to edit your screen capture further.
#4. Once you've captured your snip, you can annotate it using the Pen and Highlighter tools.
Method 3: Using Third Party Applications
If you want to use a more powerful screenshotting tool that gives you more flexibility and comes built-in with more editing features, then there are plenty of free and open-source software you can choose from.
- Greenshot: Greenshot is a lightweight, free and open-source screenshotting tool that allows users to create screenshots of different shapes and sizes. It comes with an editing tool that lets you easily annotate, highlight and even redact parts of your screenshot.
- PicPick: If you're looking for a more powerful tool that comes with more editing features, PicPick is perhaps your best bet. It's free to use and comes with an extensive suite of tools that allow you to edit, annotate and add filters to your screenshot. It also allows easy sharing across a variety of different mediums.